auth Object
You can define one or more authentication methods in the "auth" section. Each auth method should have a unique key because this key will be referenced in workflows.
To define an auth method, first, choose a unique name as the key, then assign the auth type, which is the authentication method that the service provider is utilizing to authenticate and authorize API requests.
{
  "auth": {
    "my-auth": {
      "type": "oauth2",
      "configuration": {
        ...
      }
    }
  }
}
App Studio currently supports the following authentication types.
Each auth type must be properly configured. The configuration varies based on the auth type. Please read the appropriate section(s) for details.
The OAuth2 configuration is a JSON object that contains the following properties.
| Property | JSON Type | Required |
|---|---|---|
type | string | yes |
configuration | object | yes |
defined_fields | object | no |
The value must be set to "oauth2".
configuration
Default: {}
The OAuth 2 configuration property is a JSON object that contains the following properties.
| Property | JSON Type | Required |
|---|---|---|
authorization_base_url | string | yes |
client_id | string | yes |
client_secret | string | yes |
scopes | array | yes, use empty array if no scope is specified |
token_request_body | string | no |
token_url | string | yes |
refresh_url | string | no |
include_client_id | boolean | no |
authorization_base_url
authorization_base_urlThe authorization_base is the location where we will send the user to authorize access to your integration for their account on the service provider.
It is this URL that will confirm your client_id, and scopes on the service provider and prompt the user to give authorization.
Default: '' (Empty String)
The client_id should be given to you by the service for which you are creating the integration. The client_id acts as a public identifier for your integration.
Most service providers provide a unique, hard-to-guess string.
Default: '' (Empty String)
The client_secret should be given to you by the service for which you are creating the integration. The client_secret is like your password for a service. It is a secret known only to your integration and the service provider.
Most service providers provide a large cryptographically-secure string.
Default: [] (Empty List)
A scope in OAuth terms specify exactly what access your application needs to have to a user's account for given service. It is important to note that scopes do not grant additional permissions beyond what the user already has within the service.
TIPFor more information on OAuth Scopes, visit https://oauth.net/2/scope/
Every service defines scope differently, and are usually related to the business logic of the service. If no scopes are required by the service provider, provide an empty list.
token_request_body is an optional parameter. If your OAuth server requires additional information as part of the token request, you can add that information here. If this field is not utilized, do not include it in the configuration.
Once a user has authorized your integration, the token_url will be used to obtain the OAuth access token.
The refresh_url is an optional parameter. This URL is used to refresh expired OAuth access tokens. Do not include this field in the configuration if you OAuth server doesn't support/require refreshing tokens.
include_client_id is an optional parameter to control where to include OAuth credentials when exchanging/refreshing access tokens with your OAuth server. This defaults to false.
More about include_client_idWe support including OAuth client credentials in two standard ways when making requests to retrieve or refresh access tokens (via either token_url or refresh_url). The value for include_client_id should be set appropriately based on how your OAuth server is implemented.
- Set this field to true if your OAuth server expects additional request parameters client_id and client_secret
- Set this field to false if your OAuth server expects the client ID and secret in BasicAuth format in the HTTP header
See section 2.3.1 of RFC6749: OAuth 2.0 Core for details about this standard and its alternative.
NoteFor more information regarding OAuth2: Official OAuth 2 Documentation
defined_fields
This optional section allows for the definition of a subdomain field. If the subdomain field is defined, the subdomain value becomes available to use throughout your configuration.
The following properties are used to describe how the defined fields should be presented to the user.
| Property | JSON Type | Required |
|---|---|---|
label | string | yes |
placeholder | string | yes |
help_text | string | yes |
The label is the user-friendly value displayed next to the input. The placeholder can be suggestions or instructions that appear inside the input before a value is entered. The help_text is a description of the field displayed near the input and supports commonmark markdown syntax.
Example
Here is an example of an OAuth2 config
{
  "auth": {
    "my_oauth2_configuration": {
      "type": "oauth2",
      "configuration": {
        "authorization_base_url": "https://api.example.com/oauth2/authorize",
        "client_id": "woef2qo3hefawWEWrfh2qe21wlvdflkefnqs",
        "client_secret": "[insert your secret here]",
        "scopes": [
          "insert_scope_here_if_needed"
        ],
        "token_url": "https://api.example.com/oauth/token",
        "refresh_url": "https://api.example.com/oauth/authorize"
      }
    }
  }
}
Example With Subdomain
Here is an example of an OAuth config with the optional subdomain field:
{
  "auth": {
    "my_oauth2_configuration": {
      "type": "oauth2",
      "configuration": {
        "authorization_base_url": "https://${subdomain}.example.com/oauth2/authorize",
        "client_id": "woef2qo3hefawWEWrfh2qe21wlvdflkefnqs",
        "client_secret": "[insert your secret here]",
        "scopes": [
          "insert_scope_here_if_needed"
        ],
        "token_url": "https://${subdomain}.example.com/oauth/token",
        "refresh_url": "https://${subdomain}.example.com/oauth/authorize"
      },
      "defined_fields": {
        "subdomain": {
          "label": "Account Subdomain",
          "placeholder": "Enter your Account Subdomain",
          "help_text": "Your subdomain immediately precedes the .example.com portion of your Example url."
        }
      }
    }
  }
}
For more information on using the subdomain value, see the Subdomain Data [section] (doc:commands-1#developer-subdomain-data).
Some authorization servers will require you to register the redirect URL or add it to an allow-list. The redirect URL that you should register with your authorization server is:
https://integration-layer-siphon.cluster.app-us1.com/auth/callback
The basic auth configuration is a JSON object that contains the following properties.
| Property | JSON Type | Required |
|---|---|---|
type | string | yes |
verify_url | string | yes |
defined_fields | object | yes |
type
The value must be set to "basic".
verify_url
This is required to validate user-provided credentials.
Note: verify_url expected behaviorWe make a "GET" request to this URL using the basic auth credentials provided by the user, and expect a 200 response. All other status codes will mark the credentials as invalid.
defined_fields
This section defines the username/password fields users see when supplying BasicAuth credentials. In addition, this is the place to define the optional subdomain field. If the subdomain field is defined, the subdomain value becomes available to use throughout your configuration.
When specifying the BasicAuth credential fields, you must define both "username" and "password".
The following properties are used to describe how the defined fields should be presented to the user.
| Property | JSON Type | Required |
|---|---|---|
label | string | yes |
placeholder | string | yes |
help_text | string | yes |
The label is the user-friendly value displayed next to the input. The placeholder can be suggestions or instructions that appear inside the input before a value is entered. The help_text is a description of the field displayed near the input and supports commonmark markdown syntax.
Example
Here is an example of a basic auth config.
{
  "auth": {
    "my_basic_auth": {
      "type": "basic",
      "verify_url": "https://api.example.com/ping",
      "defined_fields": {
        "username": {
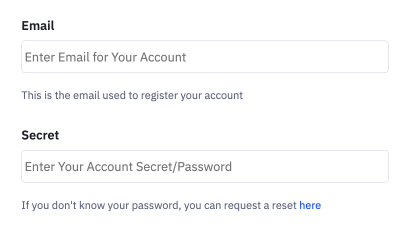
          "label": "Email",
          "placeholder": "Enter Email for Your Account",
          "help_text": "This is the email used to register your account"
        },
        "password": {
          "label": "Secret",
          "placeholder": "Enter Your Account Secret/Password",
          "help_text": "If you don't know your password, you can request a reset [here](https://account.example.com/forgot)"
        }
      }
    }
  }
}
The previous example configuration will produce the following UI.

Example With Subdomain
The following is an example of a basic auth config with the optional subdomain field.
{
  "auth": {
    "my_basic_auth": {
      "type": "basic",
      "verify_url": "https://${subdomain}.example.com/ping",
      "defined_fields": {
        "username": {
          "label": "Email",
          "placeholder": "Enter Email for Your Account",
          "help_text": "This is the email used to register your account"
        },
        "password": {
          "label": "Secret",
          "placeholder": "Enter Your Account Secret/Password",
          "help_text": "This is the password used to access your account"
        },
        "subdomain": {
            "label": "Account Subdomain",
            "placeholder": "Enter Your Account Subdomain",
            "help_text": "Your account subdomain can be found by looking at your account url: https://{subdomain}.example.com/ "
        }
      }
    }
  }
}
For more information on using the subdomain value see the Subdomain Data [section] (doc:commands-1#developer-subdomain-data).
The token auth configuration is a JSON object that contains the following properties.
| Property | JSON Type | Required |
|---|---|---|
type | string | yes |
header_key | string | yes |
verify_url | string | yes |
defined_fields | object | yes |
token_prefix | string | no |
type
The value must be set to "token".
header_key
This is the key that should be used in HTTP headers to contain the token. For example, "Authorization".
verify_url
This is the URL to validate the token provided by the user.
Note: verify_url expected behaviorWe make a "GET" request to this URL using the token auth credentials provided by the user, and expect a 200 response. All other status codes will mark the credentials as invalid.
defined_fields
Similar to defined_fields for basic auth, this section defines a token field users interact with when supplying the token value. This section can also accommodate an optional subdomain field. If the subdomain field is defined, the subdomain value becomes available to use throughout your configuration.
For token auth, you must define the token object.
The following properties are used to describe how the defined fields should be presented to the user.
| Property | JSON Type | Required |
|---|---|---|
label | string | yes |
placeholder | string | yes |
help_text | string | yes |
The label is the user-friendly value displayed next to the input. The placeholder can be suggestions or instructions that appear inside the input before a value is entered. The help_text is a description of the field displayed near the input and supports commonmark markdown syntax.
token_prefix (optional)
This is the prefix to be prepended in the token value. For example, "Token". This will cause the token to be formatted as "TOKEN user_provided_token"
Example
The following is an example of a token auth config.
{
  "auth": {
    "my_token_auth": {
      "type": "token",
      "verify_url": "https://api.example.com/token_verify",
      "header_key": "API-TOKEN",
      "token_prefix": "Token",
      "defined_fields": {
        "token": {
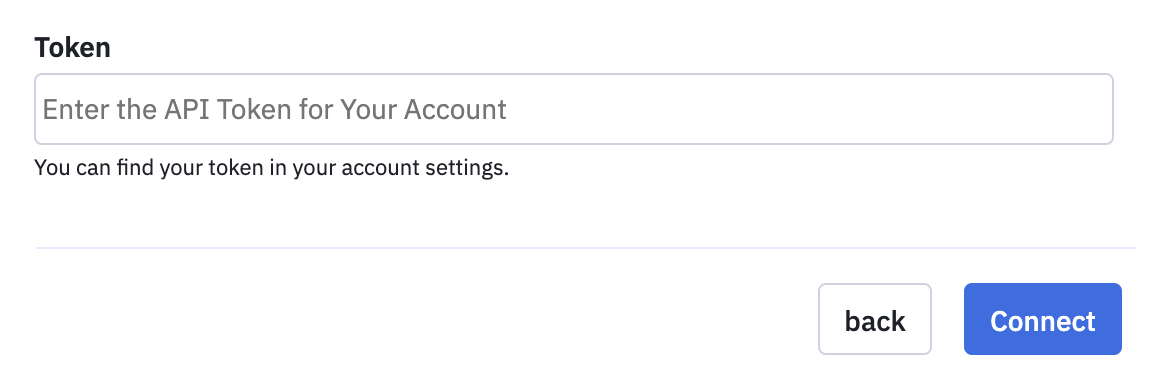
          "label": "Token",
          "placeholder": "Enter the API Token for Your Account",
          "help_text": "You can find your token in your account settings."
        }
      }
    }
  }
}
The previous example configuration will produce the following UI.

Example With Subdomain
The following is an example of a token auth config with the optional subdomain field.
{
  "auth": {
    "my_token_auth": {
      "type": "token",
      "verify_url": "https://${subdomain}.example.com/token_verify",
      "header_key": "API-TOKEN",
      "token_prefix": "Token",
      "defined_fields": {
        "subdomain": {
          "label": "Account Subdomain",
          "placeholder": "Enter Your Account Subdomain",
          "help_text": "Your account subdomain can be found by looking at your account url: https://{subdomain}.example.com/ "
        },
        "token": {
          "label": "Token",
          "placeholder": "Enter the API Token for Your Account",
          "help_text": "You can find your token in your account settings."
        }
      }
    }
  }
}
For more information on using the subdomain value see the Subdomain Data [section] (doc:commands-1#developer-subdomain-data).
Session Auth has elements of both Basic Auth and OAuth v2. When session auth is used, ActiveCampaign collects a user’s username, password, or other login details and then makes an API call with those credentials to verify the user. Once the credentials are verified, ActiveCampaign receives a token that it stores and uses to authenticate all the subsequent API calls. It works similar to a browser’s cookie-based authentication. If the token expires, ActiveCampaign performs token refresh by making an API call to the verify_url.
Your System's Connection ResponseAt a minimum, your connection response needs to return JSON with two top-level properties,
access_tokenandexpires_in.
The session auth configuration is a JSON object that contains the following properties.
| Property | JSON Type | Required |
|---|---|---|
type | string | yes |
verify_url | string | yes |
defined_fields | object | yes |
request_body | object | no |
type
The type value must be set to "session".
verify_url
This is required to validate user-provided credentials.
Note: verify_url expected behaviorWe make a "POST" request to this URL using the session auth credentials provided by the user and expect a 200 response. All other status codes will mark the credentials as invalid.
defined_fields
This object is similar to the basic auth configuration. You must define both username and password objects, but the labels can be customized to fit the credentials required to log in.
| Property | JSON Type | Required |
|---|---|---|
label | string | yes |
placeholder | string | yes |
help_text | string | yes |
The label is the user-friendly value displayed next to the input. The placeholder can be suggestions or instructions that appear inside the input before a value is entered. The help_text is a description of the field displayed near the input and supports commonmark markdown syntax.
request_body
This optional object is identical to the request body used with an HTTP command. This object can be used to send JSON data to the URL specified in verify_url, such as the grant_type requested for the OAuth2 exchange.
Example
Here is an example of a session auth config.
{
   "auth":{
      "example_sessionauth":{
         "type":"session",
         "verify_url":"https://api.example.com/oauth2/token",
         "request_body":{
            "grant_type":"client_credentials"
         },
         "defined_fields":{
            "username":{
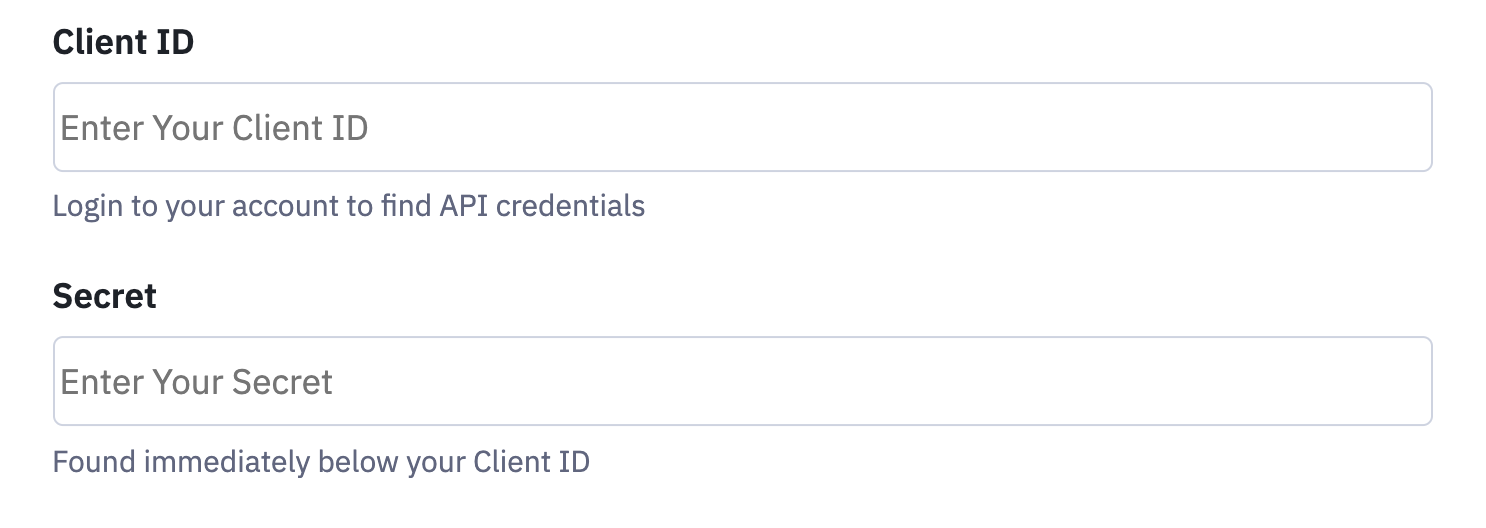
               "label":"Client ID",
               "placeholder":"Enter Your Client ID",
               "help_text":"Login to your account to find API credentials"
            },
            "password":{
               "label":"Secret",
               "placeholder":"Enter Your Secret",
               "help_text":"Found immediately below your Client ID"
            }
         }
      }
   }
}
The previous example configuration will produce the following UI.

Example With Subdomain
The following is an example of a session auth config with the optional subdomain field.
{
   "auth":{
      "example_sessionauth":{
         "type":"session",
         "verify_url":"https://${subdomain}.example.com/oauth2/token",
         "request_body":{
            "grant_type":"client_credentials"
         },
         "defined_fields":{
            "subdomain":{
               "label":"Account Subdomain",
               "placeholder":"Enter Your Account Subdomain",
               "help_text":"Your account subdomain can be found by looking at your account url: https://{subdomain}.example.com/ "
            },
            "username":{
               "label":"Client ID",
               "placeholder":"Enter Your Client ID",
               "help_text":"Login to your account to find API credentials"
            },
            "password":{
               "label":"Secret",
               "placeholder":"Enter Your Secret",
               "help_text":"Found immediately below your Client ID"
            }
         }
      }
   }
}
For more information on using the subdomain value see the Subdomain Data [section] (doc:commands-1#developer-subdomain-data).
Updated 8 months ago