Configuration Walkthrough
The App Studio app configuration JSON file contains six top-level properties and objects, $version, auth, api, data_intake, workflows, and objects. In this guide, we will go over those sections in that order.
{
  "$version": "2",
  "auth": { ... },
  "api": { ... },
  "data_intake": [ ... ],
  "workflows": [ ... ],
  "objects": [ ... ]
}
TipWe recommend starting with the Example Configuration and replacing the definitions with desired values to get a fully working config.
This property defines the version of ActiveCampaign's App Studio platform that hosts the application. This value should always be set to "2".
The auth section of the config file defines how a user connects to an integration. This must be set up correctly for the rest of the config to work. See more detailed examples and explanations in the Configuration Specification AUTH section.
Currently we support these auth types:
An example OAuth2 configuration looks like this:
{
  "auth": {
    "my_oauth2_configuration": {
      "type": "oauth2",
      "configuration": {
        "authorization_base_url": "https://api.example.com/oauth2/authorize",
        "client_id": "woef2qo3hefawWEWrfh2qe21wlvdflkefnqs",
        "client_secret": "[insert your secret here]",
        "scopes": [
          "insert_scope_here_if_needed"
        ],
        "token_url": "https://api.example.com/oauth/token",
        "refresh_url": "https://api.example.com/oauth/authorize"
      }
    }
  }
}The api section of the config file defines the API used in the integration. It has two sub-sections: base_url and pagination. See more detailed examples and explanations in the Configuration Specification API section.
This is the base URL for all API calls. For example:
"base_url": "https://api.example.com"The rate_limit object is optional. If an API has set rate limits and there is a possibility an app could make too many calls, adding a rate_limit is suggested. Rate limits can be set at the app level, or the user level.
If a rate limit is set at user level, each user who integrates this app will have their own quota of REST calls their integration will be limited to, individually.
"rate_limit": {
  "_comment": "This limits read requests to 20 requests every 60 seconds, write requests to 100 every 60 seconds",
    "user": {
      "read": {
        "requests": 20,
          "period": 60
      },
        "write": {
          "requests": 100,
            "period": 60
        }
    }
}
If a rate limit is set at an app level, all REST calls from all integrations are pooled, and set to the defined limits.
"rate_limit": {
  "_comment": "This limits read requests to 20 requests every 60 seconds, write requests to 100 every 60 seconds",
    "app": {
      "read": {
        "requests": 20,
          "period": 60
      },
        "write": {
          "requests": 100,
            "period": 60
        }
    }
}The pagination object is optional. Some API responses are paginated, meaning additional requests may be required to fetch all the data for a resource. If your API does not require pagination support, do not include this object.
Currently, the ActiveCampaign platform supports three types of pagination: page, limitoffset and cursor. Review the following styles and choose the one that works for your API.
Page-Style Pagination
The following example configuration supports an API that uses a page style of pagination. For example: https://api.example.com/my-endpoint?page=1&pageSize=50&ordering=desc
"pagination": {
  "style": {
    "type": "page",
     "page_number": {
       "param": "page",
       "value": 1
     },
     "page_size": {
       "param": "pageSize",
       "value": 50
     },
     "extra": {
       "param": "ordering",
       "value": "desc"
     }
  },
  "parser": {
  	"total_pages": {
      "!jq": "page_count"
    }
  }
}
Note
- The
valueproperty represents the starting page number. It defaults to 1.- The
extraobject provides support for any custom URI parameters required by your API, such as filtering, ordering, and so on. For example, if the URL ishttps://api.example.com/my-endpoint?page=1&ordering=desc, use"extra": [{"param": "ordering", "value": "desc"}]". You can remove this if you prefer to use default settings for your API.
Limit + Offset-Style Pagination
The following example configuration supports an API that uses a limit and offset style of pagination. For example: https://api.example.com/my-endpoint?limit=50&offset=0
"pagination": {
  "style": {
    "type": "limitoffset",
    "limit": {
      "param": "limit",
      "value": 50
    },
    "offset": {
      "param": "offset",
      "value": 0
    }
  },
  "parser": {
    "total_items": {
      "!jq": "total_items"
    }
  }
}
NoteThese values have defaults but can be changed.
- In the
offsetobject, thevalueproperty represents the starting index of data. This value should be changed if the data is not 0-based indexed.- In the
limitobject, thevalueproperty refers to the number of records that should be fetched with each API call. The range of this value is dictated by your API endpoint.- An
extraobject can be used in the same way as thepagetype of pagination to append additional URI parameters to each API request.
Cursor-Style Pagination
The following example configuration supports an API that uses a cursor style of pagination. For example: https://api.example.com/my-endpoint/limit=50&sort=age&next_cursor=abc322cba
"pagination": {
  "style": {
    "type": "cursor",
    "limit": {
      "param": "limit",
      "value": 50
    },
  	"ordering": {
    	"param": "sort",
    	"value": "age"
  	}
  },
  "parser": {
    "next_result_token": {
      "!jq": "next_cursor"
    }
  }
}
Info
- In the
limitobject,valuerefers to the number of records that should be fetched with each API call. The range of this value is dictated by your API endpoint.- In the
orderingobject, thevaluerefers to the filter used to order the results. The parameter name and ordering criteria are dictated by your API endpoint.- App Studio also supports two types of parsers to parse the response you received from the API,
previous_result_tokenandnext_result_token.previous_result_tokenis used to parse the token needed to fetch a previous page of results.next_result_tokenis used to parse the token needed to get the next page of results. The actual parameter names used will depend on your API.
The data_intake array is optional and only used to define how to set up inbound data that is pushed (using a webhook) or pulled (using API polling) into ActiveCampaign from your system. The top-level data_intake is an array of one or more data_intake objects. An application can define more than one data_intake, each dedicated to a specific task. See more detailed examples and explanations in the Data Intake reference documentation.
A webhook is a way of registering a callback between two systems. Events are pushed from one to another, often as they occur in near real-time. A data_intake defined as "type": "webhook" will create a new webhook URL in ActiveCampaign to accept incoming data. This URL is passed to the external API to register the webhook. When a webhook event occurs, the integrating system will post data to the registered webhook URL hosted at ActiveCampaign. A webhook data_intake object defines how to create, delete, and (optionally) update webhook registrations using your platform's API.
Defines the type of data_intake. For a webhook, the value must be set to "webhook".
The unique identifier for the data_intake. It is recommended to use the event name defined by the webhook API. For example, "name": "form_webhook" or "name": "event.account.created".
The scope defines the granularity of the webhook, such as one webhook for every instance of the application, one for each customer account, or one webhook for all customers. For further information, please see the Data_Intake reference documentation.
The create object defines how the ActiveCampaign platform will call your system's API to register the webhook URL. The new URL created in ActiveCampaign to receive the inbound data is available using the ${webhook.url} variable.
In the following example, the create object uses the !pipe command to chain together several commands. The !http command is used to submit the webhook URL in the body of an HTTP POST. The !jq command parses the response returned by the API. The !save command is used to store the webhook id to use in the future to update or delete the webhook.
"create": {
  "!pipe": [
    "!http": {
      "body": {
        "url": "${webhook.url}"
      },
      "method": "POST",
      "path": "/path/to/your/webhook/create/api"
    },
    {
      "!jq": "{webhook_id: .id}"
    },
    {
      "!save": {
        "scope": "workflow"
      }
    }
  ]
}The scope used in this example depends on the scope defined for the
data_intake. This value may be different for your system.
The update object defines how to update an existing webhook in your system. The associated webhook may need to be updated to continue receiving data. It is optional and depends on the publisher API definition. The following example uses the webhook_id stored in the workflow scope from the previous create example.
"update": {
  "!http": {
    "method": "PUT",
    "path": "/path/to/your/webhook/update/api",
    "body": {
      "id": "${data.workflow.webhook_id}"
    }
  }
}The delete step defines how to remove a previously created webhook to stop pushing unneeded event data to ActiveCampaign. The following example uses the webhook_id stored in the workflow scope from the previous create example.
"delete": {
    "!http": {
      "method": "DELETE",
      "path": "/path/to/your/webhook/delete/${data.workflow.webhook_id}"
    }
}Not all APIs or inbound sources support webhooks. A data_intake defined as "type": "polling" can request data from your system at regular intervals. A polling configuration has specific lifecycle events for state management, initial_setup, pre_poll, request, and post_poll. request is the only event that is required. The other events may be needed for polling to work correctly with your system.
Polling State Management
It is important to understand that polling is defined by lifecycle events in order to maintain a consistent state between events. State variables allow the platform to persist data between sync executions, as well as between its lifecycle events and request iterations.
With any of the following lifecycle events, the data returned from the last execution is examined, and if a polling_state key is found its data will be saved and made available to subsequent lifecycle events.
When writing to the polling_state key it is essential to include all known keys and their current value. Saving the polling_state replaces the entire object, not just individual keys.
Example of returning the current polling_state without change: { polling_state: ${polling_state} }
Example of returning an updated polling_state: { polling_state: { keyA: ${polling_state.keyA}, keyB: "New Value"} }
The current polling state can be accessed in your commands using the ${polling_state} variable. To access a specific value you stored in the polling state, for example, a key named last_update, you can use ${polling_state.last_update}.
Polling data_intake Object
data_intake ObjectA polling data_intake object has the following structure.
{
  "name": "name-of-resource-polled",
  "type": "polling",
  "initial_setup": { ... },
  "pre_poll": { ... },
  "request": { ... },
  "post_poll": { ... }
}Defines the type of data_intake. For API polling, the value must be set to "polling".
The unique identifier for the data_intake. It is recommended to include the name of the resource requested from your API. For example, "name": "import-customers".
initial_setup Object (Optional)
initial_setup Object (Optional)Polling takes advantage of lifecycle events and a special polling_state object. The initial_setup command runs only once when a customer configures or resets a workflow that uses polling. The most common use of this command is to initialize any polling_state keys and values for a first run. In some cases, that may involve fetching information from your system. All data returned by initial_setup except for polling_state will be ignored.
"initial_setup": {
  "!pipe": [
    {
      "!http": {
        "method": "GET",
        "url": "https://example.api/object/${custom_data::form_field.value}"
      }
    },
    {
      "!jq": "{ polling_state: { keyA: .keyA, keyB: \"fixed start value\" }"
    },
  ]
},
pre_poll Object (Optional)
pre_poll Object (Optional)Similar to initial_setup, pre_poll is used to prepare any polling_state data for the current execution cycle. This command will run once per cycle, before the request command. All data returned by pre_poll except for polling_state will be ignored.
"pre_poll": {
  "!pipe": [
    {
      "!http": {
        "method": "GET",
        "url": "https://example.api/object/${custom_data::form_field.value}"
      }
    },
    {
      "!jq": "{ polling_state: { keyA: .keyA, keyB: ${polling_state::keyB} }"
    },
  ]
},
request Object
request ObjectThe request is the foundation for the polling process. The request is used to:
- Make outbound requests, looping until an exit condition
- Update state variables for tokens/parameters based on each response
- Return a final result to be used by the application workflow
"request": {
  "!pipe": [
    {
      "!http": {
        "method": "GET",
        "url": "https://example.api/object/${custom_data.form_field.value}?keyA=${polling_state.keyA}"
      }
    },
    {
      "!jq": "{ results: .data, polling_state: { keyA: .keyA, keyB: ${polling_state.keyB}, iterate: false }"
    },
  ]
},
Because the request is iterable, a formatted object needs to be returned as the final command result. This object must return a results object, an iteration flag, and the updated polling_state object. In the previous example, a !jq command is used to create and return the required results object as the final step of the request.
results: A jq selection to return an array of data from the!httpresponse. Each item in the array will be passed to the workflow’sdata_pipline.iterate: Any jq logic that results in a boolean to let the execution know if more data needs to be fetched, such as a paginated response.polling_state: The updated polling state will be available to other commands and events.
Pagination parameters, syncTokens, and other response-driven changes to variables are to be self-managed in the state. Do not rely on the pagination mechanism defined in the top-level
apiobject, if any, for polling requests.
request Exit Conditions
request Exit ConditionsThe request command will complete and re-execute until one of the following exit conditions is met.
response.iterate== false- Total requests executed in this sync cycle exceed 100
- Total of
response.results[]from combined requests in this sync cycle exceed 1,000 response.results[]is null or emptyresponse.resultsmatches the previous request
post_poll Object (Optional)
post_poll Object (Optional)The post_poll configuration is run once per cycle after all request iterations have been completed. This lifecycle event is useful for cleanup, or perhaps an outbound request to notify a 3rd-party API endpoint. It could also be used to replicate the initial_setup for polls that don't maintain a long-term state. The format of post_poll is the same as pre_poll and initial_setup.
Webhooks are great for keeping two systems in sync. But what about data in your system generated before any webhooks are created? Historical sync is a hybrid approach that defines a one-time poll to import and sync your existing data with ActiveCampaign, and a webhook to keep data in sync going forward.
Configuration Specification
Apps that use historical sync + webhooks must include the following configuration.
- Two
data_intakeobjects, onepollingand onewebhook. These intake objects follow the existing spec for their respective type. - One
workflowobject with a typical webhook workflow. - The
workflowmust include a property namedhistorical_data_intakewith a value equal to the name of thepollingdata_intakeobject. - Unlike
polling, theworkflowshould have noschedulestep. A historical poll will continue polling the third-party system until it reaches an exit condition or the polling exceeds 100 requests. - An optional
resource_labelsobject to override labels the customer sees for webhook and historical sync events and objects.
Since both
pollingandwebhookdata sources share the sameworkflow, including the samedata_pipeline, format the polling data response array to match the webhook data. The data transform must work for both data sources.
See the Historical Sync Inbound Example for more details.
The workflows is an array of one or more workflow objects, each dedicated to a different task. Each workflow has seven properties or objects: name, description, label, type, resource_type, data_pipeline, and setup.
There must be at least one workflow defined for an application to work.
Each workflow will appear in the ActiveCampaign platform as a separate task or point of integration. For example, an app config that defines three workflows labeled "Create a Contact," "Update a Contact," and "Email a Contact" would appear to ActiveCampaign customers grouped together similar to the following.

The workflow object contains several properties and objects. Unless noted, each of the following are required.
The name of the workflow that customers see. For example:
"label": "Create a Contact"
The unique identifier for the workflow. We recommend using a "slug" based on the label text (all lower-case, spaces and other non-alphabet characters replaced with a dash). For example:
"name": "create-a-contact"
A short and clear description of the workflow. This property is optional. For example:
"description": "Sync newly created contacts from ActiveCampaign to XYZ"
The type configures the workflow as an inbound or outbound workflow. An outbound workflow should have its type set to "automations" and an inbound workflow should have a type set to "generic."
The resource_type property is an optional field for an inbound workflow. Set the value to reflect the resources that are sending data to ActiveCampaign. Please note that if you do choose to set a value, it should always be in the plural form of the resource. For example, if your system processes form submissions, this can be set to "forms".
The auth property should match the name assigned to the previously defined top-level auth object. For example, if you named your top-level auth object "my-oauth2-configuration," set the auth property of the workflow to the same name.
"auth": "my-oauth2-configuration"
The data_intake property is only required for an inbound workflow. The property value must match the name associated with a previously defined data_intake object.
The setup object defines the application setup experience for customers. For example, if your application requires a customer to choose from a list of options, enter custom text or map fields from your system to ActiveCampaign, this is where those steps are defined.
The setup object contains the following:
| Object | Inbound | Outbound | Description |
|---|---|---|---|
connect | required | required | Used to verify authentication with your API. |
select | required | optional | Used to present basic form fields to the customer to configure the application. |
map | required | optional | Used to map fields between the application |
schedule | required (only if data_intake type is "polling") | n/a | Used to setup polling behavior and frequency. |
The connect object includes a label property to display to the customer during the authentication step, an optional help_text property for any instructions, and a describe_connection object used to validate the authentication and return basic information about the authenticated user. Take a look at the following example.
"connect": {
  "label": "Connect",
  "help_text": "Login to your XYZ account. Having trouble logging in? Go to [XYZ Support](https://my-xyz-corp.com/support)",
  "describe_connection": {
    "!pipe": [
      {
        "!http": {
          "method": "GET",
          "path": "/path/to/user/me"
        }
      },
      {
        "!jq": "{account_id: .user_id, description: .full_name}"
      }
    ]
  }
The value returned by the describe_connection object is expected to be an object with two properties, account_id and description. For example:
{ account_id: "1234", description: "Joe Smith" }
The select object describes the fields used to configure an instance of your application. You can use one or more fields. Fields can be required or optional. For example, if your application is used to send a customized message to a contact, you may want to include a textarea field with the personalize property. For more information, see the Workflows setup.
Use help_text to improve your user experience!
help_textwill show a line of text that can guide your users to exactly what that field is expecting, and where to get help. It supports commonmark markdown.
Here is an example of using help_text in a form_field:
{
  "form_fields": [
    {
      "label": "From Address",
      "id": "fromaddress",
      "type": "text",
      "placeholder": "[email protected]",
      "help_text": "From address must be an approved [Sender Signature](https://www.fake-website.com)"
    }
  ]
}
example help_text
{
  "label": "Select the folder and file",
  "form_fields": [
    {
      "label": "Folder",
      "id": "folder",
      "type": "dropdown",
      "placeholder": "Select Folder",
      "help_text": "This is help text that will appear under the dropdown [You can include reference links](https://www.fake-website.com)",
      "options": {
        "!pipe": [
          {
            "!http": {
              "method": "GET",
              "path": "/folders/"
            }
          },
          {
            "!jq": "[.folders[] | {display: .name, value: .id}]"
          }
        ]
      }
    },
    {
      "label": "File",
      "id": "file",
      "type": "dropdown",
      "placeholder": "Select File",
      "help_text": "This is help text that will appear under the dropdown [You can include reference links](https://www.fake-website.com)",
      "options": {
        "!pipe": [
          {
            "!http": {
              "method": "GET",
              "path": "/folders/${custom_data::folder.value}/files"
            }
          },
          {
            "!jq": "[.files[] | {display: .file_info.name, value: .file_info.id}]"
          }
        ]
      }
    }
  ]
}
In the previous example, data for options are pulled in using piped commands. A piped command is a chain of developer commands that achieve a goal together. Read more about commands and piped commands here.
The piped command for the first dropdown will make an API call to https://api.example-integration.com/folders/, which might return JSON that looks like the following.
{
    "folders": [
        {
            "id": "1",
            "name": "Folder 1",
        },
        {
            "id": "2",
            "name": "Folder 2",
        },
    ]
}
The jq expression will transform the response above into the following to render the first dropdown list:
[
  {
    "display": "Folder 1",
    "value": "1"
  },
  {
    "display": "Folder 2",
    "value": "2"
  }
]
Once the user selects a folder in the first drop-down, their selection can be referenced via the custom_data variable. For example, the id of the drop-down list field in form fields example is "folder". You can access the value of the folder field using the following custom_data syntax.
${ custom_data.folder.value }
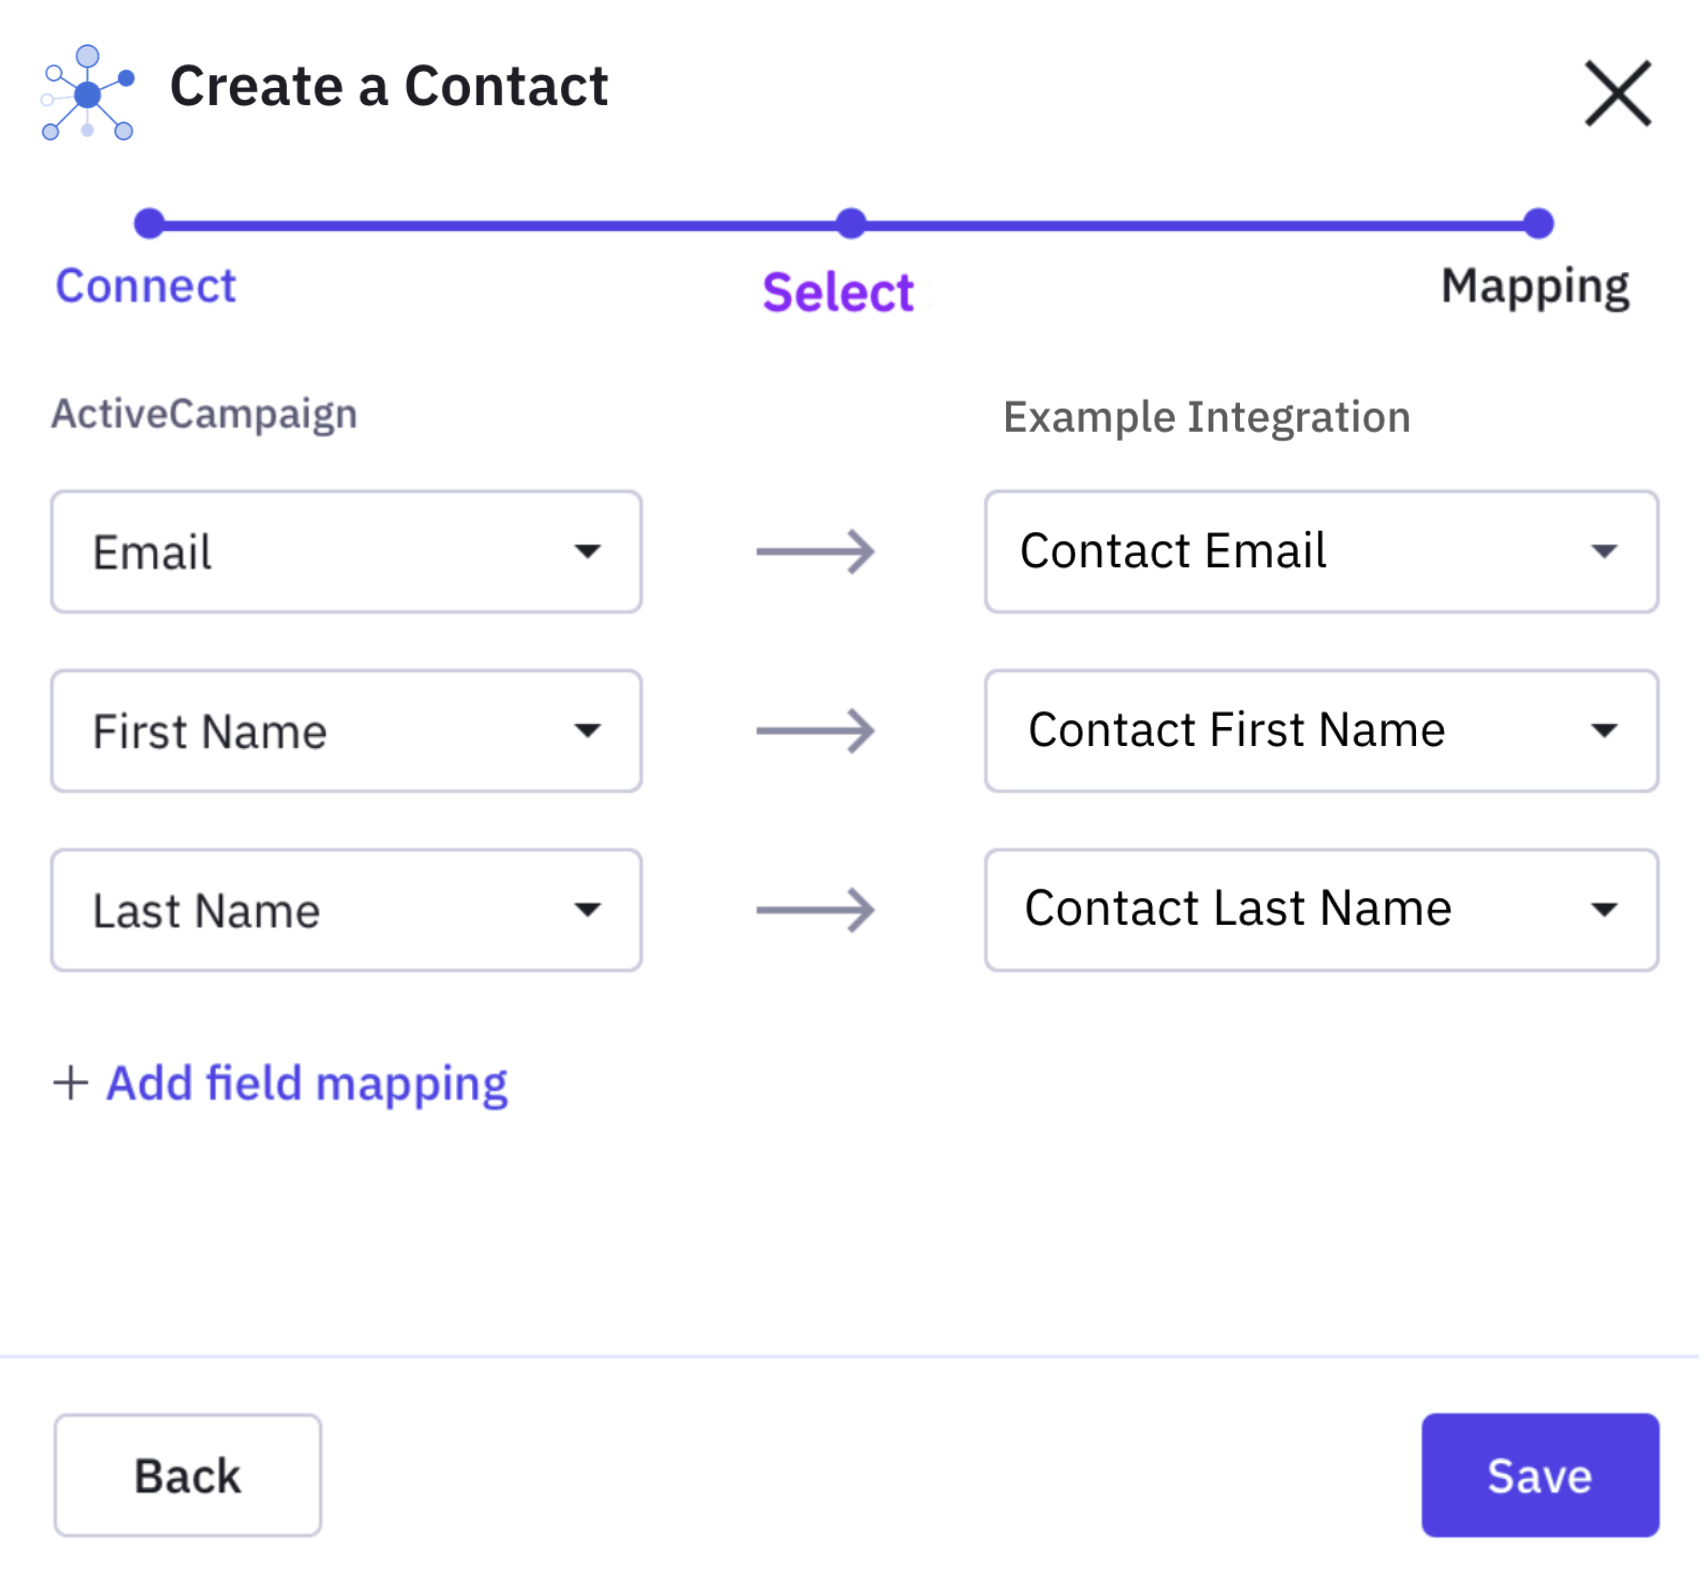
The map object describes how a customer can map fields between your integration and ActiveCampaign. The describe_source object describes where data is coming from, and the describe_target object describes where the mapped data will go.
For example, if you have an inbound workflow, it's likely the customer will want to map the inbound data to specific fields on the contact record. If the list of inbound fields is dynamic, you can use the !pipe command to chain together an !http API call and a !jq command to format the data as a list of available fields to map. Each field to be mapped is expected to be an object with the properties title, id, and an optional required flag.
For instance, if you'd like data from ActiveCampaign to go to a third-party service, you'd most likely want to use a !resource command for source, and a !pipe command that makes an http request to the third-party service for the target. In the case of fields that would be unchanging or which don't have an endpoint to define them, you can provide a static list.
The following is an example of an inbound mapping configuration with a dynamic list of fields.
{
   "label":"Mapping",
   "describe_source":{
      "label":"Example Inbound Integration",
      "options":{
         "!pipe":[
            {
               "!http":{
                  "method":"GET",
                  "path":"/forms/${custom_data.resource.id}"
               }
            },
            {
               "!jq":"[.fields[]|{title, id, required}]"
            }
         ]
      }
   },
   "describe_target":{
      "label":"ActiveCampaign",
      "options":{
         "!resource":"ActiveCampaignContact.fields"
      }
   }
}
The following is an example of an inbound mapping configuration with a static list of fields.
{
   "label":"Mapping",
   "describe_source":{
      "label":"Example Inbound Integration",
      "options":{
         "!jq": "[{ title: \"E-mail\", id: \"email\", required: true }, { title: \"First Name\", id: \"first_name\", required: false }, { title: \"Last Name\", id: \"last_name\", required: false } ]"
      }
   },
   "describe_target":{
      "label":"ActiveCampaign",
      "options":{
         "!resource":"ActiveCampaignContact.fields"
      }
   }
}
The following is an example of an outbound mapping configuration.
{
  "label": "Mapping",
  "describe_source": {
    "label": "ActiveCampaign",
    "options": {
      "!resource": "ActiveCampaignContact.fields"
    }
  },
  "describe_target": {
    "label": "Example Outbound Integration",
    "options": {
      "!pipe": [
        {
          "!http": {
            "method": "GET",
            "path": "/contact/fields"
          }
        },
        {
          "!jq": "[.fields[] | {title, id}]"
        }
      ]
    }
  }
}
The describe_source section defines how to populate available data fields of the source. In this case, we are pulling fields available for a contact from ActiveCampaign. They are in the following format:
[
  {
    "id": "email", "title": "E-mail"
  },
  {
    "id": "first_name", "title": "First Name"
  },
  {
    "id": "last_name", "title": "Last Name"
  }
]
The describe_target section defines how to populate available fields for the external data source.
Suppose "https://api.example-integration.com/contact/fields" returns the following definition:
{
    "fields": [
        {
            "field": "field1",
            "label": "Contact Email"
        },
        {
            "field": "field2",
            "label": "Contact First Name"
        },
        {
            "field": "field3",
            "label": "Contact Last Name"
        }
    ]
}
The !jq command converts this payload to the desired format to support the UI.
[
  {
    "title": "Contact Email",
    "id": "field1"
  },
  {
    "title": "Contact First Name",
    "id": "field2"
  },
  {
    "title": "Contact Last Name",
    "id": "field3"
  }
]
After setting mapping info from the UI, the following data will be saved for future data processing.
{
  "email": "field1",
  "first_name": "field2",
  "last_name": "field3"
}
Each key in the object is the value of a field in the source and is mapped to the corresponding value field in the target.
The schedule object is required to configure a polling data_intake. The schedule object contains a label, description, import_options, and frequency. All are required. The following is an example of a schedule configuration.
"schedule": {
  "label": "Schedule Sync",
  "description": "Choose the behavior of your sync",
  "import_options": [
    {
      "label": "Import contacts and auto import new contacts in the future",
      "type": "recurring"
    },
    {
      "label": "Import contacts and do not auto import new contacts in the future",
      "type": "single"
    }
  ],
  "frequency": 1800
}
label Property
label PropertyA user-friendly label to display for this configuration step. For example, "Schedule Sync."
description Property
description PropertyDescription or instructions to display above your import/sync options. For example, "Choose the behavior of your sync."
import_options Object
import_options ObjectAn array of possible import behaviors. Each behavior is an object with a label and a type property. The type can be either "recurring" or "single". At least one or both import behaviors can be listed.
frequency Property
frequency PropertyThe number of seconds between polling executions. This value is currently fixed at 1800 (30 minutes).
A data_pipeline makes sure data from the source arrives at the target in the correct format. The source and target sections handle the input and output of the data pipeline, respectively.
Typically, there will be a mapping defined before a data_pipeline so that customers may choose which fields they want to send or receive. We want to ensure that only meaningful data is communicated between ActiveCampaign and an integration. This is especially true when sending data from ActiveCampaign to another system, as some customer contacts may have hundreds or even thousands of fields.
The following is an example of an inbound data_pipeline configuration to sync data from a third party to ActiveCampaign.
{
  "source": {
    "!jq": ".data | [.[] | {name: .attributes.name, id: .id}]"
  },
  "target": {
    "!resource": "ActiveCampaignContact"
  }
}
The !jq command extracts the required data from the incoming payload and saves it in a format that ActiveCampaign can understand. This data will be passed as input to the "target" section to create a contact in ActiveCampaign.
The following is an example of an outbound data_pipeline configuration to sync data from ActiveCampaign to a third party.
{
  "source": {
    "!resource": "ActiveCampaignContact"
  },
  "target": {
    "!pipe": [
      {
        "!jq": "{data: ${piped_content.0}, action: "update"}"
      },
      {
        "!http": {
          "method": "POST",
          "path": "/contacts/create",
          "body": {
            "contact_data": "${piped_content.1}"
          }
        }
      }
    ]
  }
}
In the previous example, ${piped_content.0} refers to the output of the mapping step that was explained further above. The output of one section of a workflow, if there is any, is implicitly piped to the next section. ${piped_content.0} will refer to the contact object's email, first_name, and last_name` since that is what was mapped out.
By default, ActiveCampaignContact has 4 fields, email, first_name, last_name and phone. It can also have as many more custom fields to suit a user's needs. This is one of the reasons it is recommended to always provide a mapping step if the outbound data can vary between implementations.
If there wasn't a preceding workflow step with output, then ${piped_content.0} would have referred to the output of the !resource command, which would have been the full ActiveCampaignContact for the contact record that is being processed through the workflow.
This tells the integration to expect input data in a specific format and convert if needed.
{
  "email": "[email protected]",
  "first_name": "Campy",
  "last_name": "Cool"
}
This data is converted to the new format automatically based on the mapping info supplied in the map step.
{
  "field1": "[email protected]",
  "field2": "Campy",
  "field3": "Cool",
}
TipIn a
!pipecommand, you can reference the initial input and output from all steps using the${piped_content.INDEX}expansion. Read more here
Then this data will become the input to the "target" section, where it will be further transformed by !jq into:
{
  "data": {
    "field1": "[email protected]",
    "field2": "Campy",
    "field3": "Cool"
  },
  "action": "update"
}
Finally, this is sent out using the !http command.
The objects array contains one or more Core or Custom Objects used to define additional data storage requirements for your integration.
For more information on the objects array, please read the objects Array reference documentation.
Updated about 1 year ago