Create Your First App- Part 2: Custom Objects
Part 2: Supercharge your CX App with Custom Objects
In Part 1, we built and tested the first version of a CX application that allows users to securely communicate with our API. At ActiveCampaign, we call this an Outbound Application, which means all the data flows out from ActiveCampaign to your api.
In this tutorial, we will be updating this CX app to write a Custom Object record for any of the Contacts sent into api. This will be the first step in turning this application into both an Outboundand an Inbound application.
By the end of this tutorial, the CX App you started in Part 1 will do the following:
- Sends a Contact's data to the your API (completed in Part 1).
- Receives a response from your API, and will save that response as a Custom Object for that Contact (Part 2).
Prerequisites
- Completed Tutorial: Part 1 (You have a functional CX Application saving data to your Pipedream API)
-
Custom Object permissions must be turned on for your developer account. If you are unsure if you have Custom Object writing permissions, please reach out to [email protected].
🔎 Overview
- Add Custom Object Responses To Your Python Api. Your API will respond with a JSON object that will be written as a Custom Object record on any Contact that our automation is run on.
- Edit Your CX App to Write Custom Objects. Your CX App will then receive, transform, and save your API's JSON response as a Custom Object.
- Verify Custom Objects Are Being Created. We'll test and observe it working!
What are Custom Objects?
Custom Objects enable you to model and manage your data in a way that reflects your unique business. For instance, if you are a music shop who sells instruments and gives lessons, you can build a “Lessons” Custom Object that enables you to manage types of lessons, times, instructors, and customers in an easy way that makes sense to you. You can then trigger automations based on events and data related to your Custom Objects and create more personalized experiences for your customers.
Custom Objects enable you to model and manage your data in a way that reflects your unique business, giving you unparalleled flexibility to track interactions with your Contacts.
When you want to track a single data point ((e.g., customer id, job title), A custom field might be what you need. Custom Objects are perfect for tracking multiple sets of corresponding data on a single Contact. Here are some examples of data sets Custom Objects can be used for:
- Website Orders
- Sports Team Signups
- Employee information such as team, position, office equipment assigned, etc.
Deep dive into more on Custom Objects here: What are Custom Objects?
What we've built so far
So far, we've built a CX app in App Studio, and a Python API built in Pipedream, that does the following:
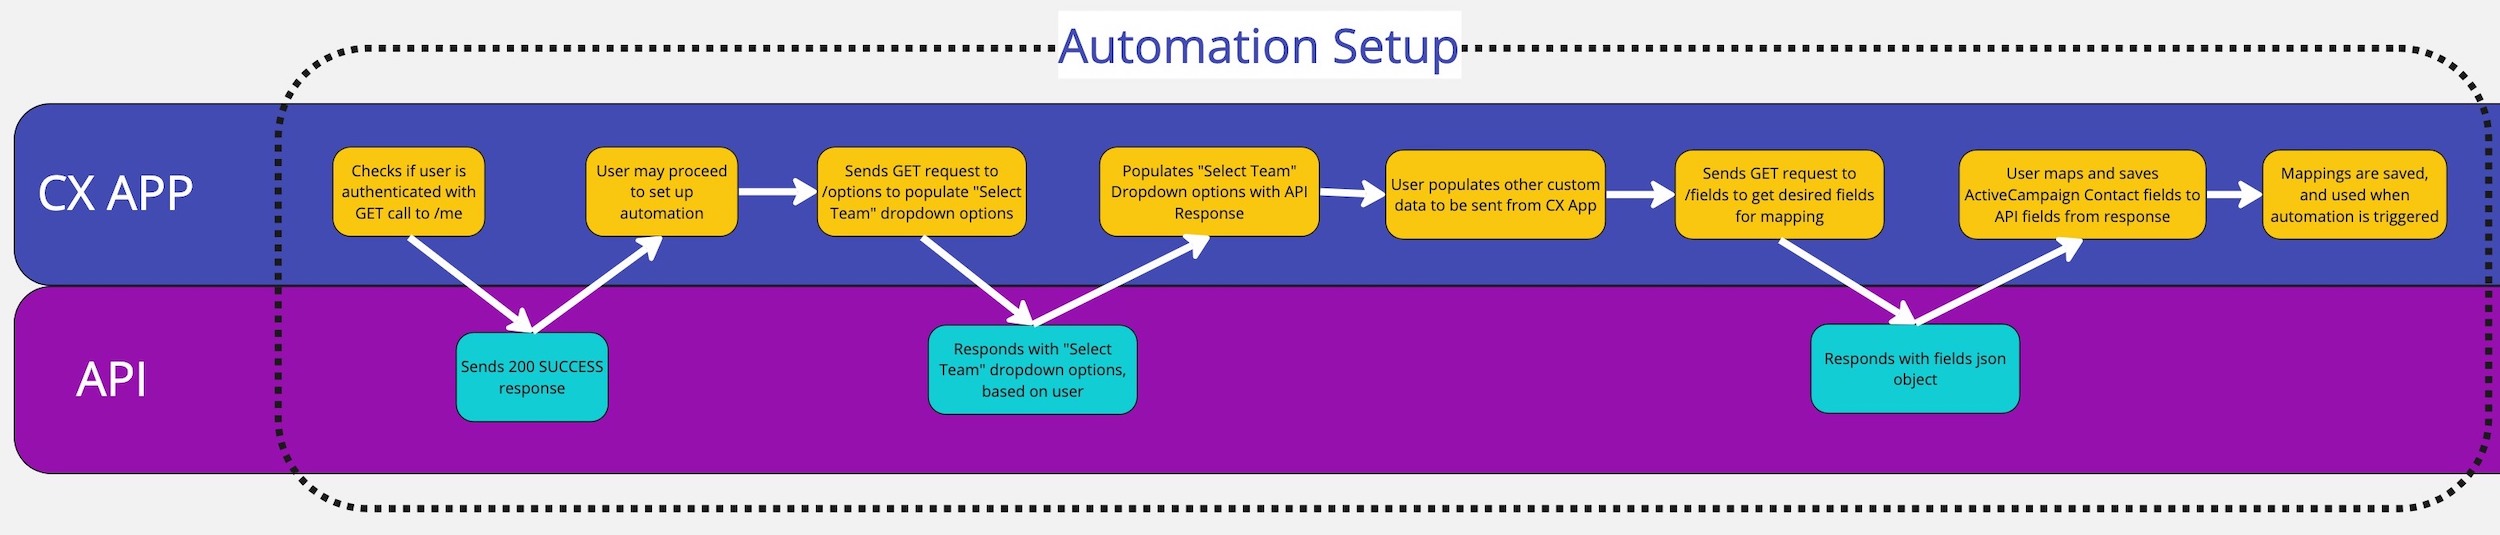
At the end Part 1, we had a working CX App that sent data to a Python api:
- An automation passes a Contact into to the CX app
- The CX App sends a Contact's record to the API
- The API saves the Contact record to it's data store
What we're building
We're going turn what we've built in Part 1 into a system for registering players into sports teams!
Here is what the workflow will look like when we're done:
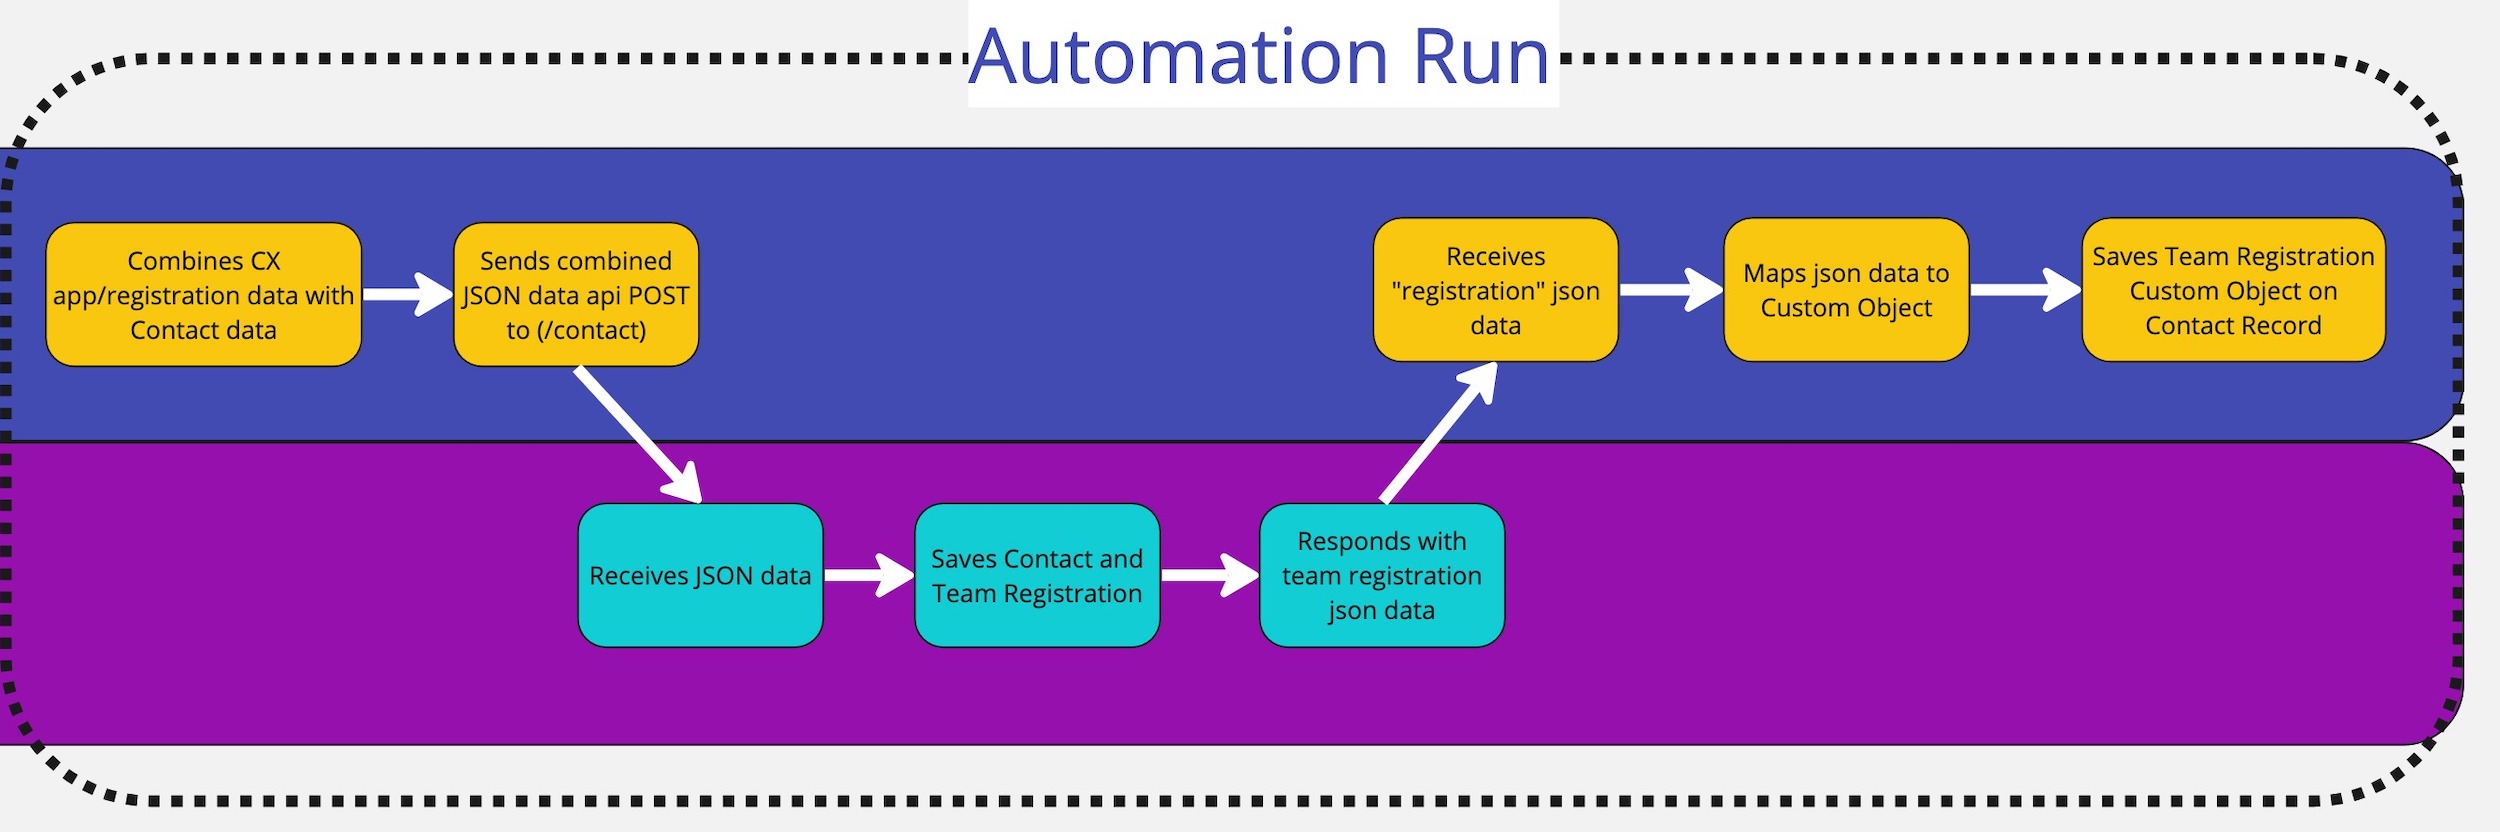
In this tutorial, we will be adding Custom Objects:
- The API will create and save a "team registration" for the Contact
- The API will respond with that team registration as json data
- The CX App will receive the API's json response, and save the team registration as a Custom Object on the Contact's record
🐍 Edit the API to return a JSON response

We're going to build in a real use-case for a CX app: An app that registers players for team sports.
Let's add Python code to our API that will receive the Contact json data from our CX application, registers that contact for a sports team, and then send back that registration information.
Later, we'll edit the CX app to write that response to a Custom Object on our Contact.
Here is the data we want to return when a Contact's record is sent to our API. Later, we'll save it as a Custom Object record:
{
	"registration": {
		"playerId": "[email protected]", //The email address of the contact will serve as player ID
		"teamId": "team1", // The ID of the team the contact is registered for
		"teamName": "Red Team", // The name of the team they are reigstered for
		"preference": "player", // Options: coach, assistant, player
		"info": "Any extra information goes here",
		"status": "Approved" //Options: approved, pending, denied
	}
}
We're going to change a couple of simple things in the pipedream API, to return json registration data. See the updates, here:
Copy and paste the contents of the above recipe into your pipedream-powered API. The API will now create, save, and return a team registration based on the provided input.
Example Json data sent from the CX APP ➡️ API:
{
	"team-select": {
		"display": "Red Team",
		"value": "team1"
	},
	"textarea-value": "Extra information goes here",
	"position-select": "Player",
	"contact": {
		"email_address": "[email protected]",
		"first_name": "John",
		"last_name": "Doe",
		"phone_number": "+55555555555"
	}
}
Json data saved to the contacts store in Pipedream:
contacts store in Pipedream:{
"firstName": "John",
"lastName": "Doe",
"phoneNumber": "+55555555555",
"customField1": null,
"customField2": null,
"registration": {
"playerId": "[email protected]",
"teamId": "team1",
"teamName": "Red Team",
"preference": "Player",
"info": "Extra information goes here",
"status": "Approved"
}
}Json data response sent from the API ➡️ CX APP:
{
	"registration": {
		"playerId": "[email protected]", //The email address of the contact will serve as player ID
		"teamId": "team1", // The ID of the team the contact is registered for
		"teamName": "Red Team", // The name of the team they are reigstered for
		"preference": "player", // Options: coach, assistant, player
		"info": "Any extra information goes here",
		"status": "Approved" //Options: approved, pending, denied
	}
}
Now that we're creating and returning a registration, we need to save that data/response as a Custom Object record on any of our Contacts!
⚙️ Edit the CX App to create Custom Objects
There are a few changes we need to make to our CX App, that will give it the ability to save Custom Object records. There are many important updates, so make sure you read through the recipe below!
Now that our CX Application has the ability to save the API's response as a Custom Object, our final step is setting up the the Automation we created previously, to send the right data.
🤖 Refresh Your Automation
With our new CX Configuration code saved, we should now be able to register contacts for a chosen team. The UI for the automation should look like this:
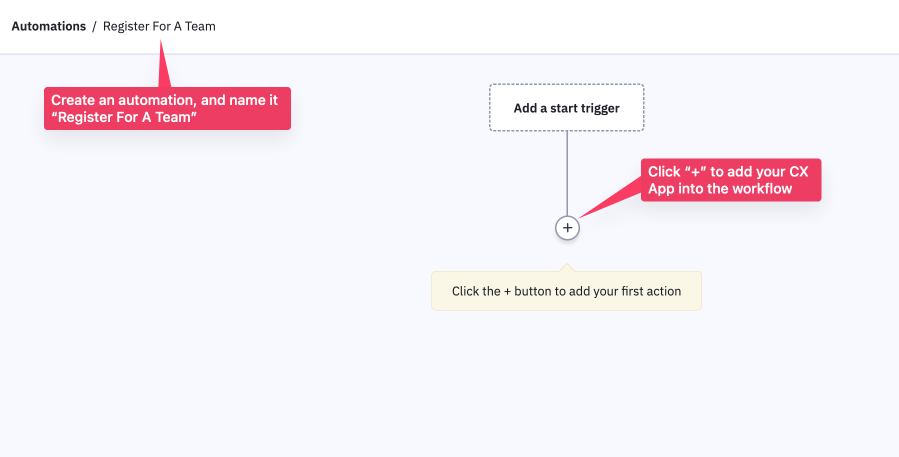
Setup an automation
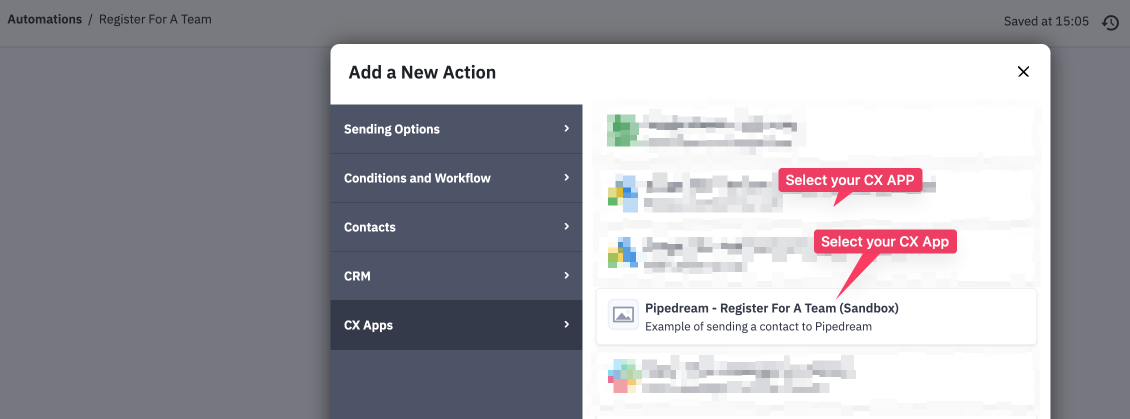
Choose your CX App
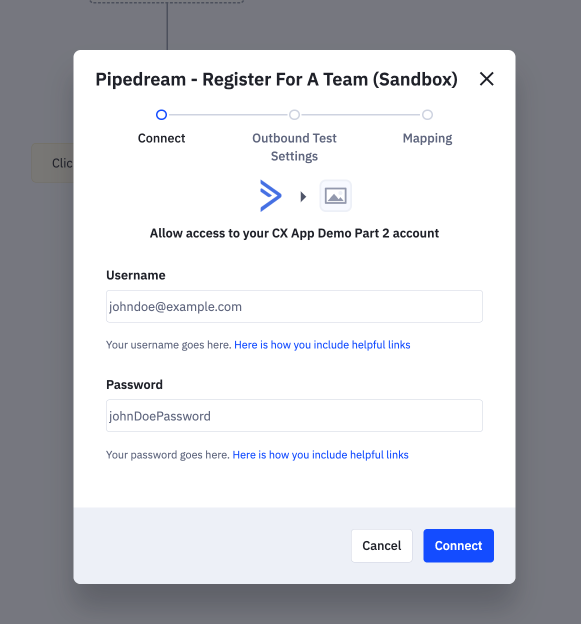
Sign in with the credentials hardcoded in the Python API
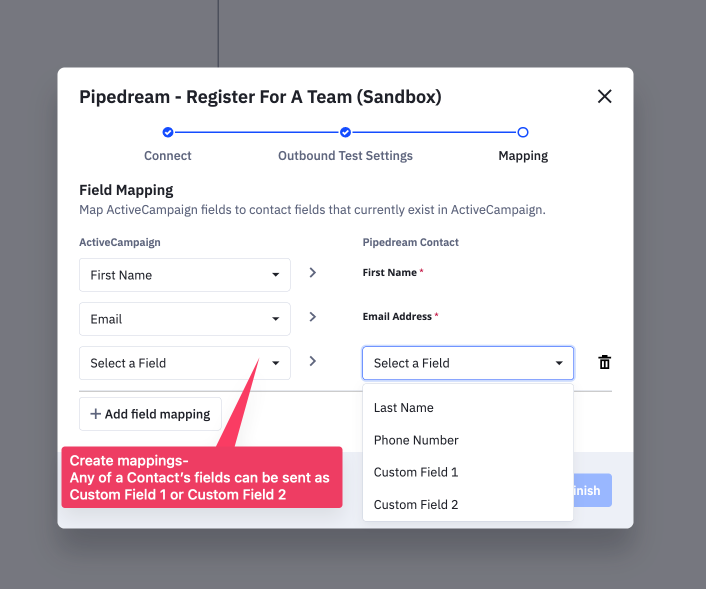
Complete the mapping step
✔️ Verify Custom Objects Are Being Created
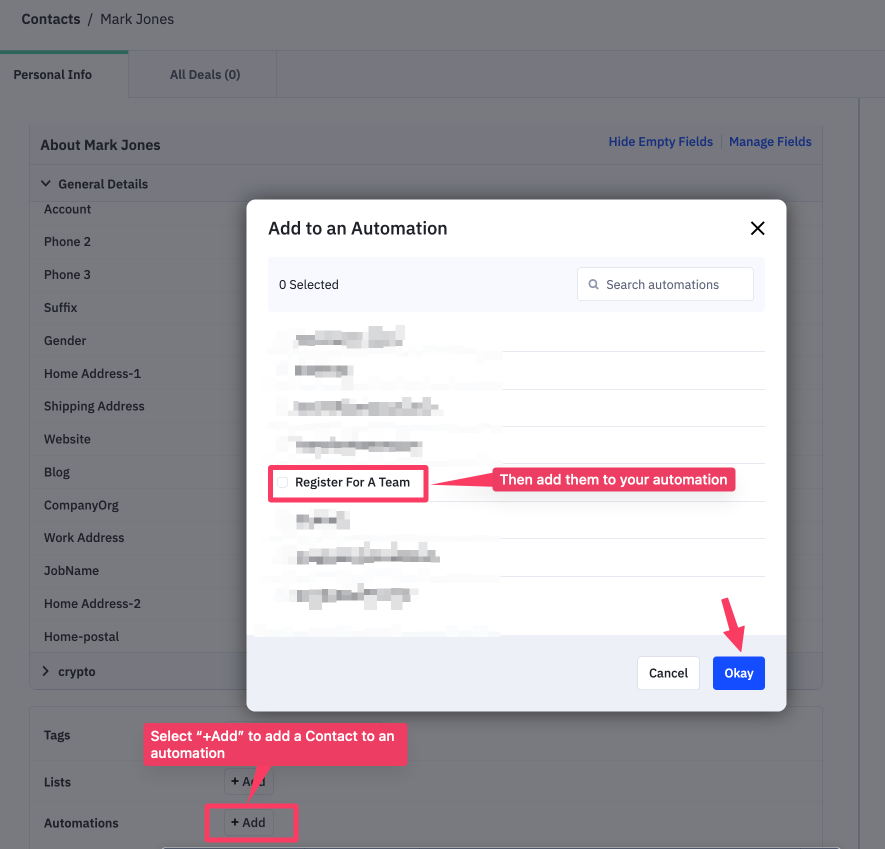
Add a test contact to the Automation
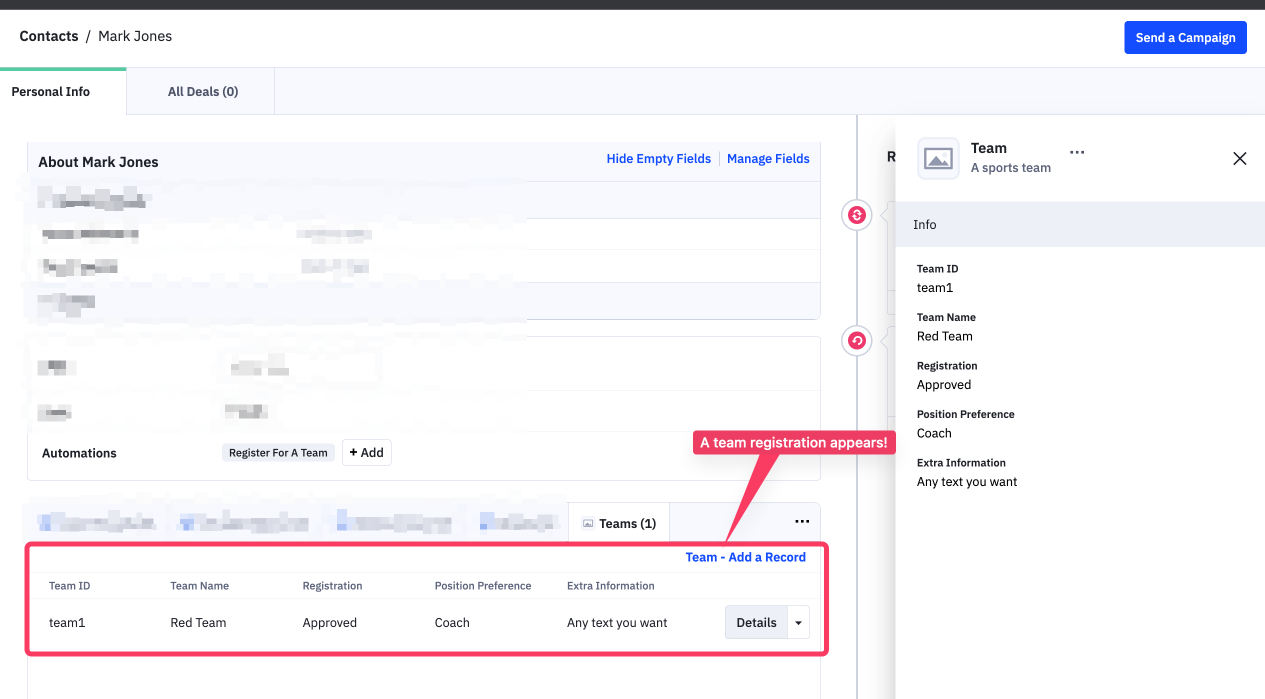
After a few seconds, you should see a Custom Object record saved on the Contact! (You may need to refresh the page)
What's next?
...but what happens if a member of a team quits the team, or changes their preferences? Is there a way to keep our API and our Contact records in sync if there are any changes? There is!
Part 3 of this tutorial will cover webhooks, enabling both our CX App and our API to keep each other up-to-date, instantly.
Updated about 1 year ago
What’s Next
Create and Your First App- Part 3: Webhooks (COMING SOON)