Create Your First App using Pipedream and Python: Part 1
PART 1: Build your first CX App that communicates with a Python API
App Studio is used to build native applications and integrations for the ActiveCampaign platform. We call them CX Apps. CX is short for "Customer Experience." A CX App built with App Studio can be published privately (for internal use by your organization) or publicly in the ActiveCampaign App Ecosystem.
In this tutorial, you will learn how to use App Studio to build an outbound CX App and test the app using Pipedream. Pipedream is a powerful serverless platform for connecting systems. Pipedream can be used to prototype APIs, test integrations, host webhooks, or build production apps and integrations. Outbound CX Apps are used as actions in Automations to send data from ActiveCampaign to other systems.
Tutorial Overview
In this tutorial, you will learn to create the following.
- Create a mocked API in Pipedream using Python. Your API will authenticate a login, return data to populate a dynamic list of options that is different for each user, and will both receive and save contact information from ActiveCampaign.
- Create an app in App Studio. You will use create a JSON configuration file that describes how ActiveCampaign will interact with your API.
- Create an Automation to test the app. By creating an Automation, you will see how an ActiveCampaign customer would configure your app, and you will be able to inspect the data that is sent from ActiveCampaign to the API as part of the app lifecycle.
Prerequisites
A free Pipedream account
Create an App in App Studio
Login to your ActiveCampaign sandbox account. Click Apps and then App Studio. Click Build a New App.

App Studio, Build a New App
Complete the Create New App form using your email address and click Submit.

Create New App form
Click the Home tab. Click Start Building.

Start building
CX Apps built with App Studio are configured in the App Configuration Editor. An app config is a JSON document that conforms to the App Studio Configuration Specification.

App Studio Editor
Create a Pipedream Workflow
In this step, you will use Pipedream to create a mock API for your CX App to connect and interact. First, create a new workflow in Pipedream. This workflow will become the API for your CX App.

Create a new workflow in Pipedream
Next, select the HTTP / Webhook Requests trigger for the workflow.

Click HTTP / Webhook Requests trigger
Edit the trigger to Return a custom response from your workflow

You now have a URL you can use for your App, but it does not do anything, yet. Click on the plus (+) to add a step to the workflow.

Add step
Click on Run custom code.

Click Run custom code
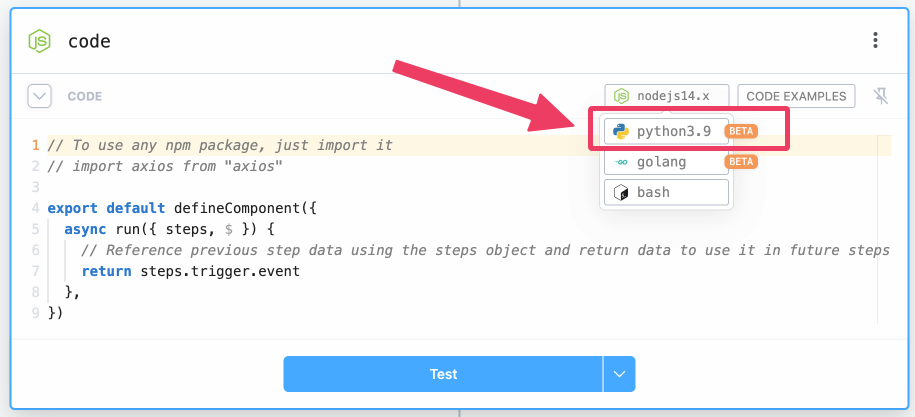
Select "Python" to write Python code blocks
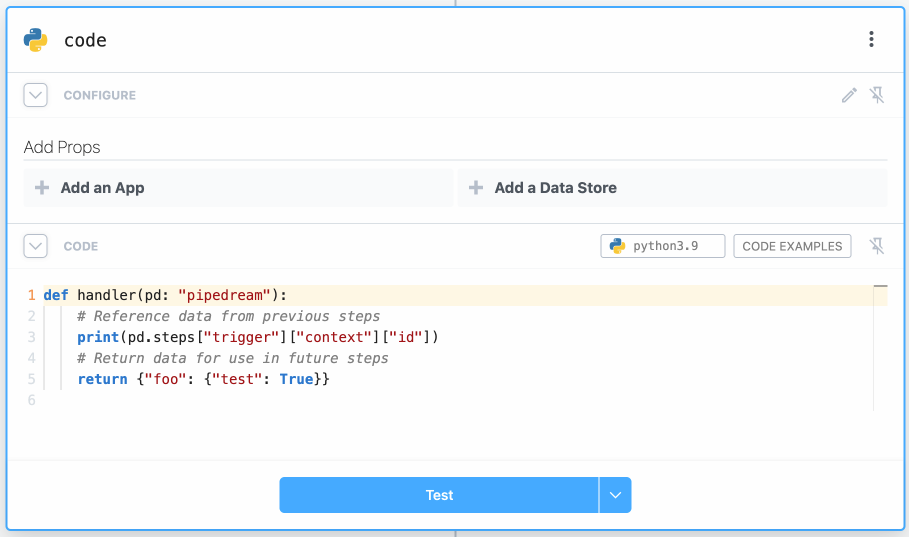
The Python Code Block should look similar to this, we'll come back to it in a bit.
Create a Pipedream Data Store
Create the Store
In this step, you will set up a Data Store in Pipedream that will be where Contacts are stored when they are sent from the CX app to your API.
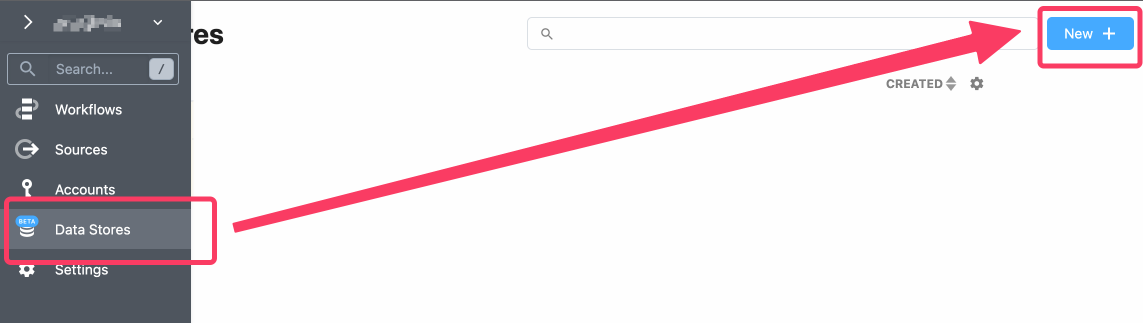
Select "Data Stores" in the right menu
Enter the following code inside the existing async code block.
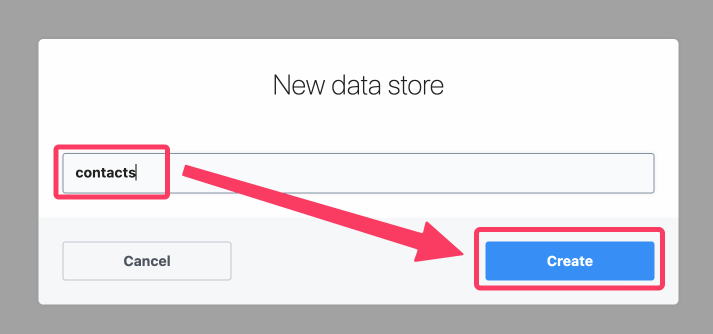
Name the Data Store "contacts"
Here is an example of how data stores can be used in Pipedream:
def handler(pd: "pipedream"):
    store = pd.inputs["data_store"]
    store['darth'] = 'vader' # Storing
    name = store['darth'] # Retrieving
    print(f"The name stored is: {name}"
    # --> The data stored is: vader
Connect it to your Python Code Block
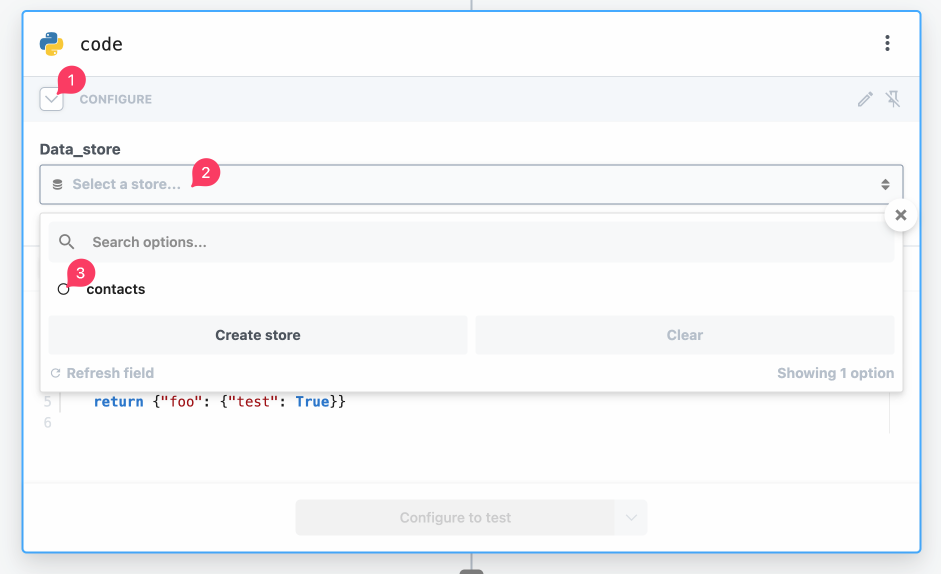
Go back to your workflow and select the code block we created earlier. To connect the data store with this code block, do the following:
- Select CONFIGURE
- Select the Data_store
- Select the contacts data store we created.
Finish the Python Code in Pipedream
Don't just copy and paste the api! Use the recipe below to learn how every part works - we'll be building a lot of features on this in future tutorials.
Copy and replace everything in the Pipedream workflow from the recipe above, and click Save.
Deploy Your Code
Next, test the API code you just added. Click the Test button to validate there are no errors, and then the Deploy button. Copy the URL assigned to this Pipedream URL. Open another browser window or tab, paste the URL, and press Enter.
Remember to "deploy" your changesYour Pipedream workflows aren't available until they are deployed.
You should see the following data returned in your browser window. This response is an example of what ActiveCampaign expects to receive when authenticating with your API.
If you are familiar with Python or other programming languages, you may be able to follow the code logic. However, it's totally okay if you don't understand all of the code. The features of the API include the following.
- The API uses Basic Authentication to validate every request. Any request that does not include a valid username and password will be rejected with a standard HTTP 401 error.
- An API request sent to
/mewill return a JSON object that includes an account ID and username. - An API request sent to
/optionswill return a JSON object that includes an array of options. - An API request sent to
/fieldswill return a JSON object with afieldsarray for the mapping step. - JSON data sent to
/contactwill respond with a 200 http code, and will save it to ourcontactsdata store.
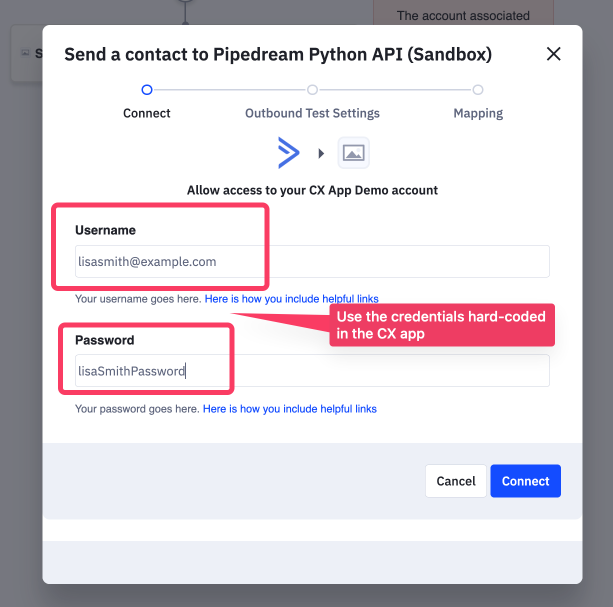
In the Python API we built, you will see there are two hard-coded users and credentials:
| USERNAME | PASSWORD | NAME | ID |
|---|---|---|---|
[email protected] | johnDoePassword | John Doe | 22222 |
[email protected] | lisaSmithPassword | Lisa Smith | 33333 |
The Username and Password will become the credentials you must enter when you test your CX App in ActiveCampaign. The ID and Name are the values the /me API will return with a successful authentication.
Update the App Config in App Studio
Don't just copy and paste the CX app configuration! Use the recipe below to learn how every part works, it'll help you write your own CX apps in the future!
In the app config, there are two placeholders currently set to {{your-pipedream-url}}. Go to your Pipedream workflow and copy the URL assigned to your workflow. Replace the two placeholders in App Studio with your personal Pipedream URL.
When you have finished updating the JSON in the App Configuration Editor, click Save and click Test App in Sandbox.

Edit, save, and test app
When you click the Test App in Sandbox button, you will be directed to your CX App's connections page. The first time you do this, there will be no connections listed. Once a connection is established you can return here to view a list of active connections. You can also find usage logs for your connected CX App here.

List of existing connections and usage logs
Any time you make a change in App Studio, click both the Save and the Test app in sandbox buttons. If you have your CX App open in another browser tab or window, refresh the page to ensure you are seeing the latest version of your app.
Create a New Automation
So far, you have created an API in Pipedream and CX App using App Studio. The next step is to create an Automation you will use to test the CX App. Click the Automations link in the navigation menu and then click the Create an Automation button.

Create a new automation
Click on the Start from Scratch option then click the Continue button.

Start from Scratch
Click Start without a trigger. You will manually add a Contact to the Automation when you are ready to test it.

Start without a trigger
Click the + button to add a new action to the Automation.

Click the + button
Click on the CX Apps tab and then click on your CX App.

Add a new CX App action using your CX App
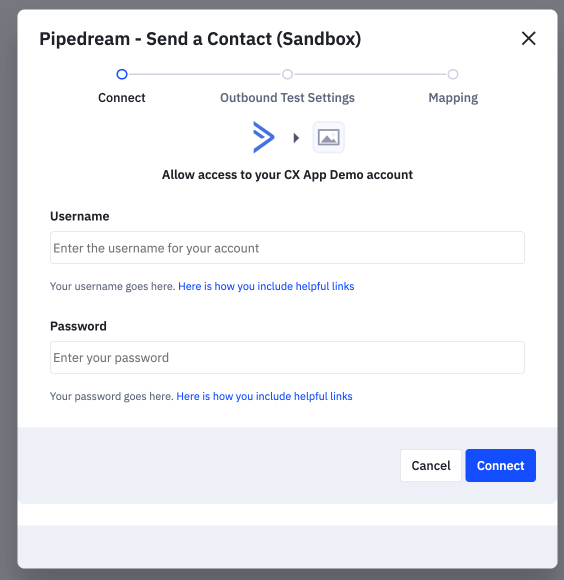
When your CX App is added to the Automation you will need to establish a connection. This connection will use the authentication scheme defined in the auth section of your CX App's config file. Enter the same Username and Password you set in the Pipedream workflow params section. Click the Connect button.
Enter CX App credentials
The username and password will be sent to your Pipedream API to verify it is valid. If the username and password do not match what is stored in Pipedream, you will see an error and you may retry the login.
Remember the credentials?
USERNAME PASSWORD [email protected]johnDoePassword[email protected]lisaSmithPassword
Next, you will configure your outbound workflow. In the app config, three form fields were defined.
- A drop-down list that is populated by making a call to your
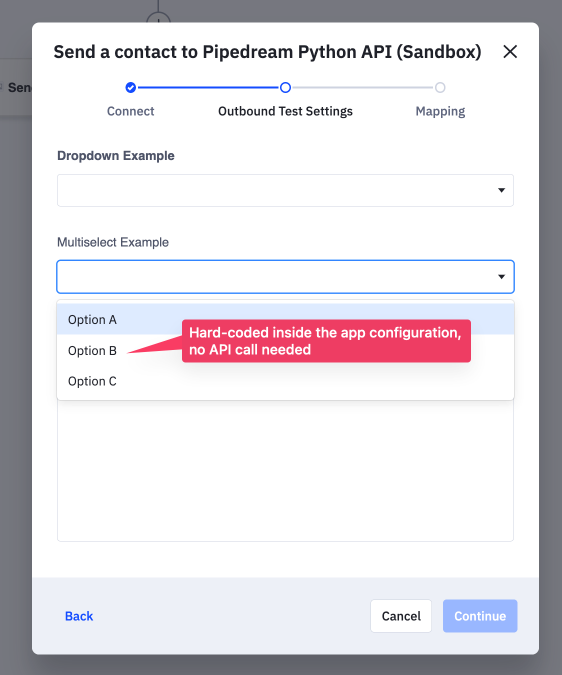
/optionsAPI endpoint. - A multi-select list populated with a static list of options.
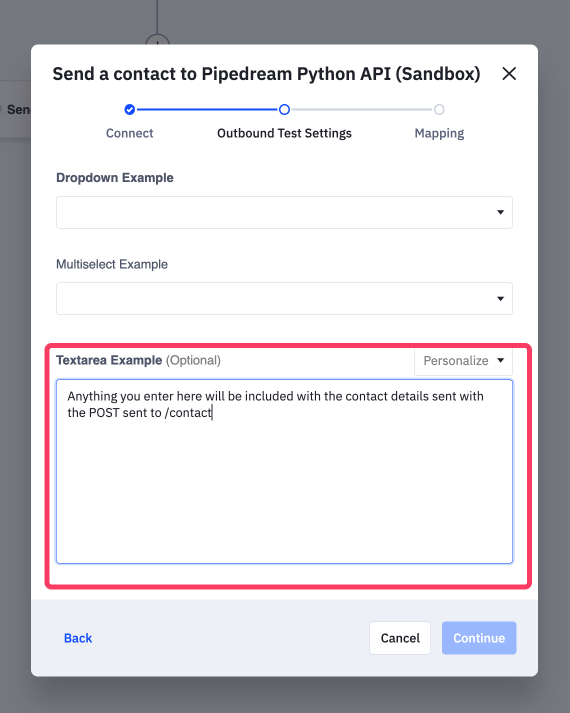
- A textarea field that can be personalized with contact data.
The credentials entered here will be sent to your Pipedream API when the CX App's outbound workflow is executed. These fields were defined on the select object for the workflow in the App Config file.
The Dropdown Example box is populated with a call to /options, and the Multiselect Example is populated from the hard-coded options already included in the app.
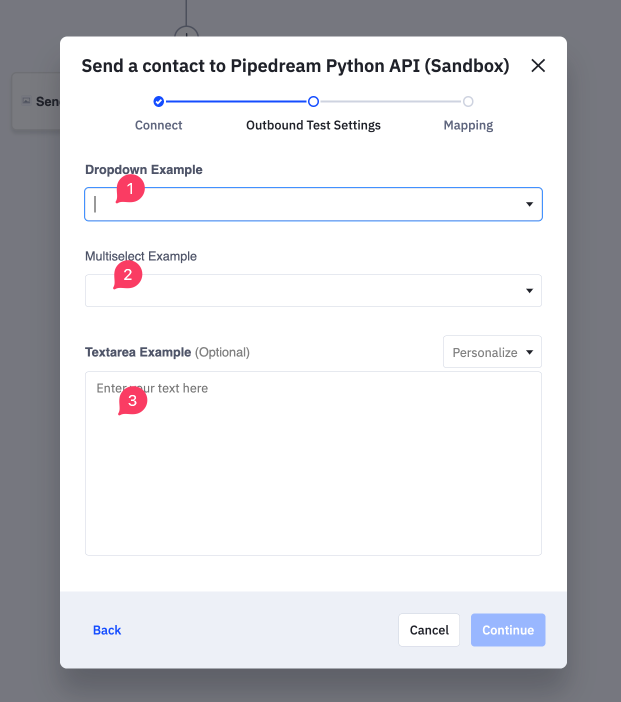
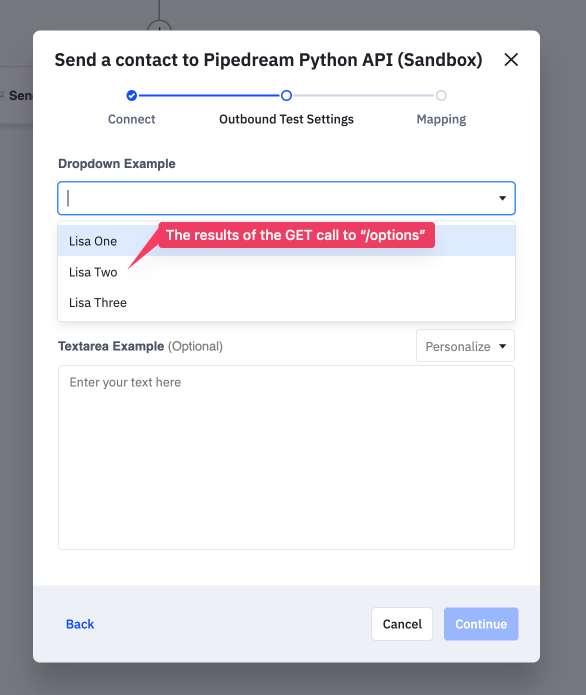
Note that if you log in as [email protected], the options in the dropdown will change to what's available for that user, because that is what is returned with the GET call to /options
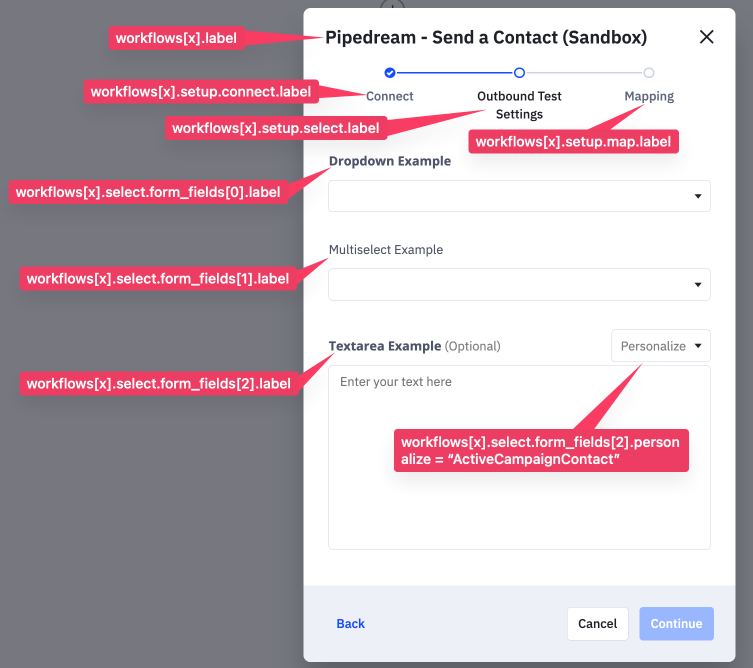
This is how each part of the configuration file maps directly to how it is rendered
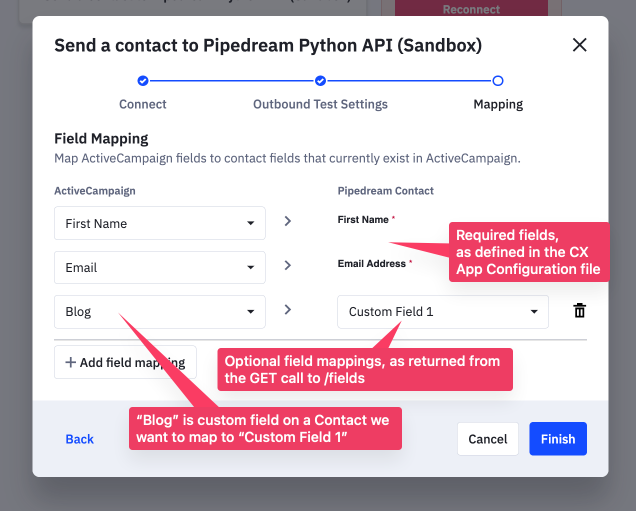
Next, you will configure the mapping of ActiveCampaign fields to the outbound system. These fields were defined in the map object for the workflow in the App Config file. Mappings are optional, but this example is designed so you can see how the mappings work.
Enter a name for your automation then click the Save button. Then click the Active button before testing.

Name and save the automation
Test the Automation Using a Contact
Now that the Automation has been created and set to Active you can add a Contact to the Automation to test the CX App. Click on Contacts and then click on a Contact to go to the Contact Details page.

Contacts page and Contact selection
In the Details page for your Contact click the + Add button next to Automations. Select the Automation that you just created and then click Okay.

Add the Contact to the Automation
Once the Contact has been added to the Automation your workflow should have executed. Navigate back to your CX App's Connections page by clicking on Apps and then clicking on Connected Apps. In your CX App's Connections page click View Logs. You should see a log entry for the Contact that you added to the Automation in the last step.

View logs for your CX app
Back in Pipedream you can also view the data that was sent to your API when the outbound workflow was executed:
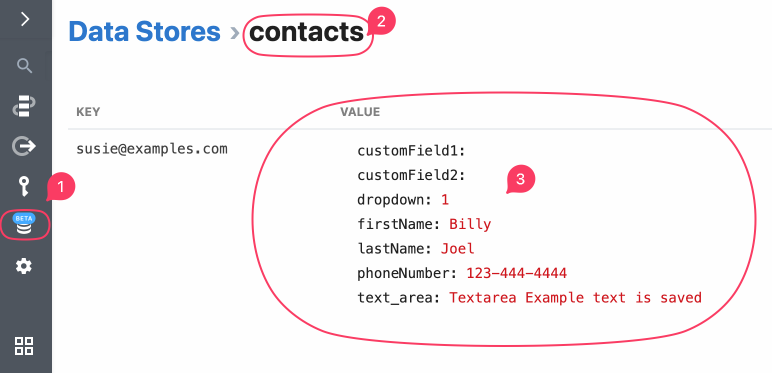
Inside your data store "contacts" you should see your contact saved.
A Quick Review:
If you have made it this far, congratulations! You have successfully created and tested a CX App using App Studio, that talks to a Python Api! Let review what we built, and exactly is happening:

Next Steps
Feel free to make changes to your CX App configuration, such as lists and textarea, and re-run the Automation as many times as you wish. See how those changes affect the data posted to Pipedream. Explore and tweak the API code and the app config and see how that affects the CX App.
Pipedream is a powerful platform for building custom integrations. You may want to use Pipedream as the "glue" between ActiveCampaign and another system you wish to integrate. Or, continue to use Pipedream to test and mock any part of a CX App you are building whenever you need to inspect requests or data sent from ActiveCampaign.
Updated about 1 year ago
What’s Next
Supercharge your app with Custom Objects!