workflows Array
The workflows array contains a list of workflow objects. Each object is associated with an action (e.g., create an ActiveCampaign Contact). For each workflow, you can define a guided setup experience, as well as how data should be processed.
The
workflowscan include an inbound workflow, multiple outbound workflows or multiple outbound workflows with an inbound workflow.
| Key | JSON Type | Required |
|---|---|---|
| name | string | yes |
| description | string | no |
| label | string | yes |
| type | string | yes |
| resource_type | string | no |
| auth | string | yes |
| data_intake | string | Depends on type of integration. Inbound - yes Outbound - no |
| historical_data_intake | string | no |
| resource_labels | object | no |
| setup | object | yes |
| data_pipeline | object | yes |
Be careful: Workflow can not be deleted, and their NAMES can not be updated!You can change the label (what users will see) at any time, but once a workflow is published, the workflow can not be deleted, and it's name can not be changed.**
When an app is published, users will implement these workflows into their automations. These workflows are identified in our system by the
nameyou assigned to it. If in a future update the workflow is deleted, or its name is changed, users who have that workflow previously implemented will continue to use the old workflow- "branching" your configuration: Some users still using the old workflow, and new implementations using the new workflow.If a workflow is not deleted and its name is not changed, any workflow content updates will be provided to all users.
The name of the workflow, must be unique for the workflows of an app.
A "human-readable" name to distinguish different workflow objects. This value is used to list workflows. The label property should use the following format: Brand Name - What it does. For example, Twilio - Send an SMS.
A one sentence summary describing what the workflow does. This sentence should end with a period. For example, "Send messages to your Contacts using Twilio."

The associated ActiveCampaign app. This helps workflows to be discovered and used in the appropriate context. An app can have multiple workflows for multiple ActiveCampaign apps.
WarningCurrently, the type value is limited to "automations" for outbound workflows and "generic" for inbound workflows.
This is an optional field that is used by inbound apps to indicate what resource type is sending data to ActiveCampaign. This information is useful if your inbound app is also intended to be used as a trigger in Automations. This value should always be the plural form of the resource type. For example, if your resources are landing pages, the value can be set to "pages".
Below is an example of an app that has an inbound workflow with "resource_type" set to "pages". Users can select this trigger when setting up automations in ActiveCampaign, so that every time MyApp processes a page, more actions can take place within our platform. You can learn more about how your app can be used as a trigger under the "Branded app triggers" section in this article.

The associated auth method. Attribute value must match one of the auth methods defined in the auth section.
The data_intake to use for the workflow. The value should match the name of a defined data_intake object. This property is not required for outbound integrations.
The data_intake to use for a one-time data import. The value should make the name of a defined polling type data_intake object. This is an optional feature for webhook-based workflows. This property is not required for outbound integrations.
Using Polling with Custom Object WorkflowsCustom Object Workflows do not currently support displaying a
setup.schedulestep. To allow imports to operate with developer defined values, the following optional fields are available on the Polling Data Intake:
frequency: int (Must be >= 60 (Seconds) Recommended:1800)
import_option: string (can besingle, orrecurring. Recommended: "recurring")These fields are only compared and used in Custom Object workflows, standard imports will ignore these values in favor of those defined by the user in the scheduling step.
An optional object to override labels the customer sees for webhook and historical sync events and objects.
"resource_labels": {
  "webhook_events": ["Event A", "Event B"],
  "webhook_objects_updated": ["Object A"],
  "historical_sync_events": ["Sync Event A"],
  "historical_sync_objects_updated": ["Sync A", "Sync B"]
},
setup is where developers can define a guided user experience for setting up the integration.
Typically, the setup should include the following sections also referred to as steps:
NoteThe above-mentioned setup steps are the same for both inbound and outbound workflows.
All the 3 steps are required for inbound integrations.
For outbound integrations:
Connect - required
Select - optional
Map - optional
and should be defined as per your use case.
This step allows the user to authorize the integration and ActiveCampaign to access their data.
When this step is included in your setup, our integration layer will handle the authorization logic based on the Auth section, but you need to define the following fields:
| Key | JSON Type | Required |
|---|---|---|
| label | string | yes |
| describe_connection | object | yes |
| help_text | string | no |
A user-friendly value used to display this step in the UI.
"describe_connection" is specific to the "connect" step, it provides information about the currently connected user.
It's a command that gets data needed to display user information. The output should have the following attributes:
- account_id: the unique ID for the connected account. This is often the email.
- description: what user information should be displayed when the connection is successful
Help text that will be displayed during the "Connect" step. This section supports commonmark markdown. Please note, unless otherwise specified, other help_text fields may not support markdown at this time.
InfoThis information is normally obtained from the publisher via an api call, and the response is formatted via jq. As a result, the command will often contain two commands: !http and !jq.
Example:
{
      "label": "Connect",
      "describe_connection": {
        "!pipe": [
          {
            "!http": {
              "method": "GET",
              "path": "https://api.example-integration.com/me"
            }
          },
          {
            "!jq": ".body | {account_id: .email, description: (.name + \" - \" + .email)}"
          }
        ]
      },
      "help_text": "Connection level help text that does support [markdown](https://commonmark.org/help/)"
    }
About account_idIf your integration uses an application level webhook, the account_id value must also appear in the webhook payload for us to properly link data to intended users. See webhook scopes for details.
The select step allows users to select the external resource that will be used to sync data with ActiveCampaign.
For example, inbound - if an integration syncs Typeform form submissions data to ActiveCampaign, users can specify which form's data they need in this step.
outbound - if an integration syncs changes within ActiveCampaign to Google Sheets, users can specify which sheet to send data to in this step.
| Key | JSON Type | Required |
|---|---|---|
| label | string | yes |
| form_fields | list | yes |
| describe_selection | object | only for inbound apps |
HTML label for this step field.
A list of HTML inputs to allow users to pin-point the desired external resource.
A form field has the following attributes:
| Key | JSON Type | Required | Possible Values |
|---|---|---|---|
| label | string | yes | |
| id | string | yes | |
| required | boolean | no | true, false default value: true |
| type | string | yes | "text", "textarea", "dropdown", "multiselect" |
| placeholder | string | no | |
| search_term | string | no | Any string that will be used in the url as a search term. For example, a search termuserName will become the query parameter ?userName=<user-input> |
| personalize | string | no - For type of textarea only | if defined, "ActiveCampaignContact" |
| options | object | yes - For any type other than textarea |
The label shown in the form for the field.
A unique identifier for the field, suggested to be the value from the label but all lower case, with spaces replaced with dashes. This MUST be unique in a workflow, as it is used for custom field expansion in other parts of your configuration.
This is a boolean attribute indicating whether a form field is required or not. When required, this field must be filled out before the user can move to the next setup step. This defaults to true.
When set to false, a field becomes optional. Users are allowed to move to the next setup step without providing any input to the optional fields.
The type of form field.
Available types are:
- dropdown
- textarea
- text
- multiselect
To allow users to select a single value from a list, use the "dropdown" type:

To allow users to select multiple values, use the "multiselect" field type:

To allow users to define text (with or without personalization), use the "text" or "textarea" field type. Use "text" for shorter strings such as a single word or line of text. Use "textarea" for longer or multiline strings.
Below are examples of "textarea":
- Textarea with personalization.

- Textarea without personalization.

The placeholder value to show before a value is entered.
The optional search_term attribute is a part of the form_fields section. If filled out, the value of this attribute will be used as a query parameter when executing that form field’s !http command. Of course, this will work only if search is supported by the API.
For example, when using a dropdown field, this would allow the user to search for a select option by typing into the dropdown field. The user’s input will end up as the search term’s value when the API call is made.
For example, providing the search_term a value of “search” will result in the ?search=<user-input> query parameter.
Below is an example dropdown form field with with search_term:
{
  ...,
  "form_fields": [
    {
      "label": "Choose Your Form",
      "type": "dropdown",
      "id": "form",
      "placeholder": "Select Form",
      "search_term": "search",
      "options": {
        "!pipe": [
          {
            "!http": {
              "method": "GET",
              "path": "/forms",
              "pagination": true
            }
          },
          {
            "!jq": "[.items[] | {display: .title, value: .id}]"
          }
        ]
      }
    }
  ]
}For the "textarea" type, personalize is optional.
If you want to let users define text with personalization (please see screenshot above for an UI example), then set this key to "ActiveCampaignContact" to allow users to customize the textarea with standard and custom fields defined for their contacts. When accessing this value in the data_pipeline section of your configuration using custom field expansion, the substitution strings in this value will be automatically replaced with values from the contact being processed.
If the text being defined by users contains % characters or other characters that may be removed with personalization (ie: urls) set personalize to false. "personalize": false
If you want to let users define text without personalization (please see screenshot above for an UI example), do not define the personalization attribute in the formfield definition.
When using anything but "textarea" type, you must specify a list of options for users to select from, each option should have two attributes: display and value.
This information is normally obtained from the publisher via an api call, and the response is formatted via jq. As a result, the command will often contain two commands: !http and !jq.
NoteFor any formfield, once the user selects a value from options, the selected value will be saved. To access a saved value, use custom_data.
Optional Fields
When a field is declared as optional (using the required attribute above), you may not always get a value back if the user skipped it during setup. To refer to the value of an optional field, you must append the "default" filter to the expansion. This will default to an empty string if the optional field is not filled out by the user.See example below.
Example:
{
      "label": "Select Your File",
      "form_fields": [
        {
          "label": "Folder",
          "id": "folder",
          "required": false,
          "type": "dropdown",
          "placeholder": "Select Folder",
          "options": {
            "!pipe": [
              {
                "!http": {
                  "method": "GET",
                  "path": "https://api.example-integration.com/folders/"
                }
              },
              {
                "!jq": "[.body.folders[] | {display: .name, value: .id}]"
              }
            ]
          }
        },
        {
          "label": "File",
          "id": "file",
          "type": "dropdown",
          "placeholder": "Select File",
          "options": {
            "!pipe": [
              {
                "!http": {
                  "method": "GET",
                  "path": "https://api.example-integration.com/folders/${custom_data.folder.value | default:1}/files"
                }
              },
              {
                "!jq": "[.body.files[] | {display: .file_info.name, value: .file_info.id}]"
              }
            ]
          }
        }
      ]
    }
This example will render 2 dropdowns, "Folder" and "File".
For the "Folder" field, the first !http command will make an API call to https://api.example-integration.com/folders/, which returns this response:
{
      "folders": [
        {
          "id": "1",
          "name": "Folder 1"
        },
        {
          "id": "2",
          "name": "Folder 2"
        }
      ]
    }
The !jq command then transforms the response above into the following to render the first dropdown list:
[
      {
        "display": "Folder 1",
        "value": "1"
      },
      {
        "name": "Folder 2",
        "value": "2"
      }
]When the user selects a value from any input, their selection can be referenced via the "custom_data" expansion.
${custom_data.ID.ATTRIBUTE} In the example above, if the user selects the first folder, then expressions below would evaluate to the correct values:
${custom_data.folder.display}.  # evaluates to "Folder 1"
${custom_data.folder.value}.     # evaluates to "1"
As the first input is defined as optional, the user could select nothing, in that case, reference will fail when we use expressions above. Always use the "default" filter to safely refer to an optional field. You can pass a default value to the default filter, or use it without any arguments:
${custom_data.folder.display|default:MyFolder}.  # evaluates to "MyFolder"
${custom_data.folder.display|default}.  # without any argument, default evaluates to empty string
These saved values can then be used in subsequent steps. In this example, we are using the selected folder value (${custom_data.folder.value}) as part of the second API call to narrow down choices for the "File" dropdown.
This section is required for inbound apps and it allows the app to identify the resource that the user selected from the step above.
These two attributes are required:
- resource_id
- display
Both these attributes should be defined by using a command that produces a string value. These values normally map to the custom data from user selection.
For the folder example, the section would look like:
{
  "resource_id": {
    "!jq": "${custom_data.folder.value}"
  },
  "display": {
    "!jq": "${custom_data.folder.display}"
  }
}
Why are these needed?resource_id: used to uniquely identify the resource selected by the user;
display: used to render the resource selected by the user. You can customize how resource names appear using jq.
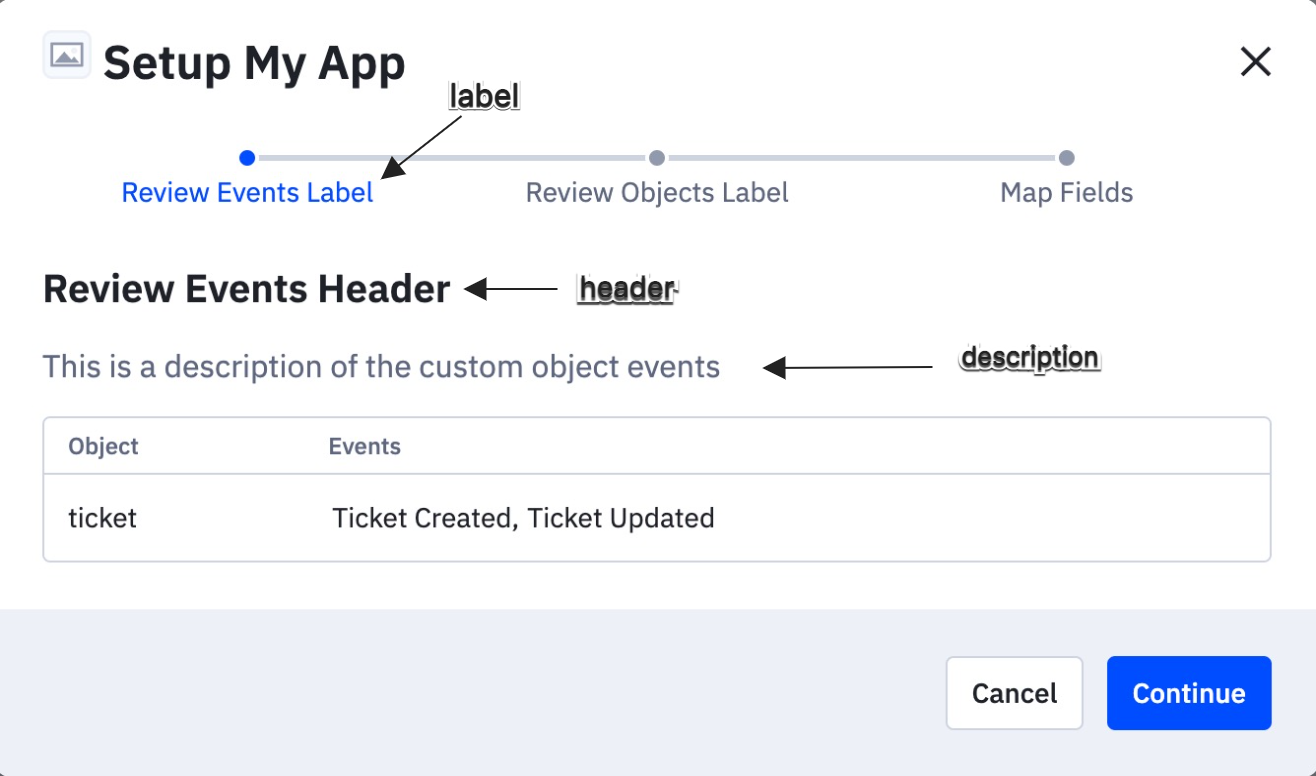
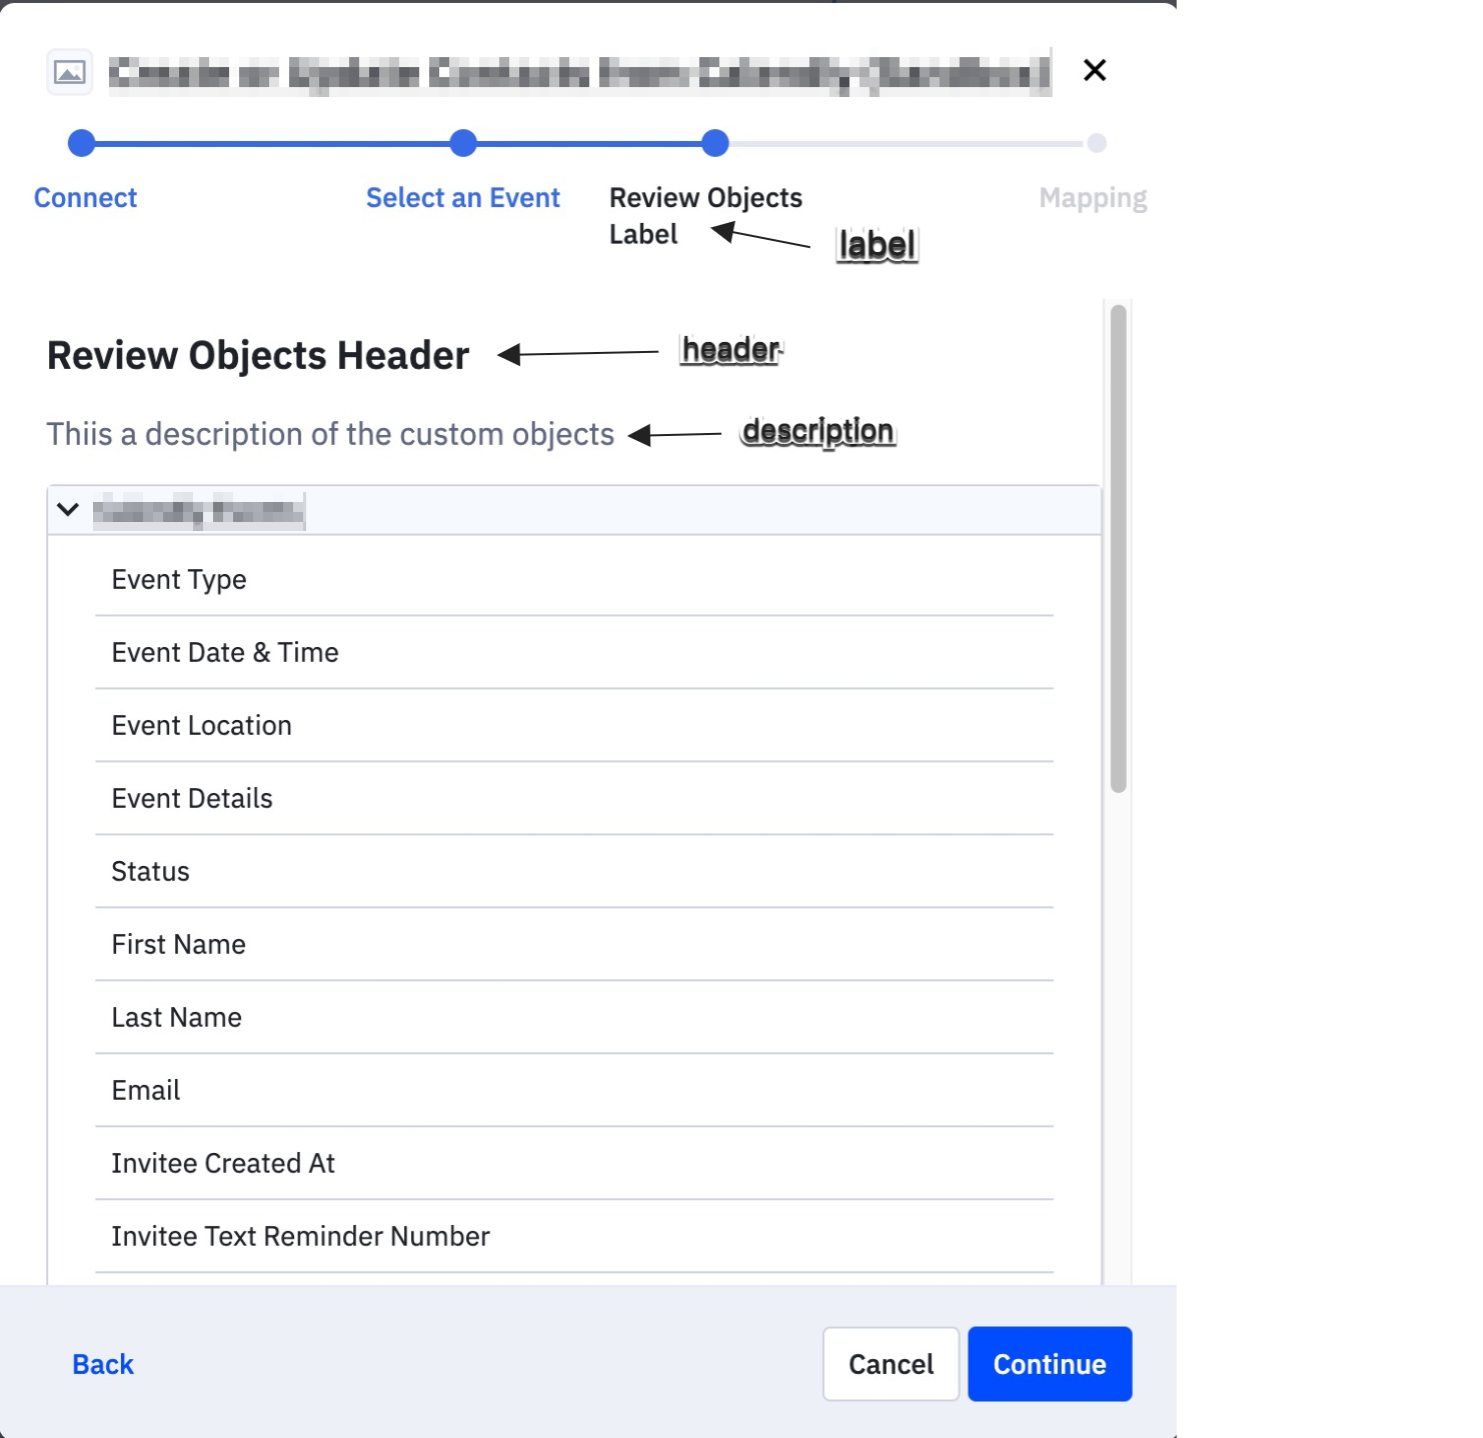
The review_events and review_objects sections allow developers to define descriptive and user-friendly text that shows within the review events and review objects steps modal.
review_events and review_objects are only applicable if the app uses custom objects.The
review_eventsandreview_objectssections are always optional and exist within workflows → setup.
The review_events and review_objects sections are only applicable when the app config uses custom objects. Also, depending on the app config thereview_eventsmight not be needed/used, whilereview_objectscould be.
| Key | JSON Type | Required |
|---|---|---|
| label | string | no |
| header | string | no |
| description | string | no |
A user-friendly value used to display as the stepper text in the UI.
A user-friendly value used in the header text within the review modal.
User-friendly descriptive text that explains what the custom objects and events are all about.
Example review_events:
review_events:"review_events": {
"label": "",
"header": "",
"description": ""
}
Example review_objects:
review_objects:"review_objects": {
"label": "",
"header": "",
"description": ""
}
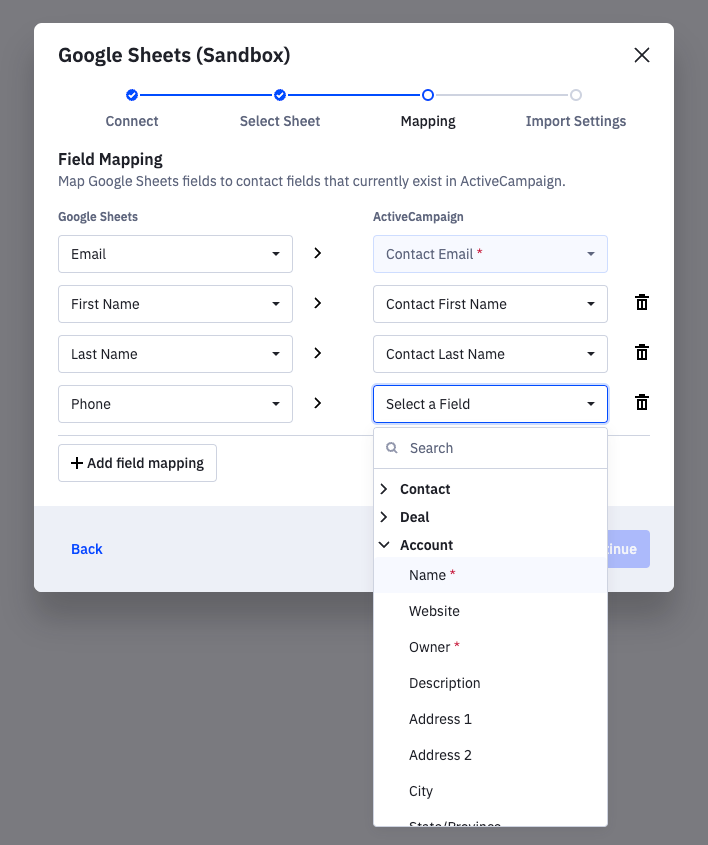
The map step allows users to map any field in your system to an ActiveCampaign field and vice versa. This mapping info allows data to be transformed properly between the integration and ActiveCampaign. For example, a user may choose to map "Given Name" from your system to "First Name" in ActiveCampaign.
You need to define fields for both source and target. Depending on the direction of data flow, ActiveCampaign should be either the target (inbound, meaning data flows into ActiveCampaign from your system) or source (outbound, data flows from ActiveCampaign to your system).
Grouped MappingBoth
describe_sourceanddescribe_targetcan now define multiple sources and targets. This is done with a new key:groupthat can be included on eachoptionsobject. Here’s what this looks like when using group keys in combination with contact, deal, and account fields fordescribe_targetoptions:
| JSON Type | Required | |
|---|---|---|
| label | string | yes |
| describe_source | object | yes |
| describe_target | object | yes |
User friendly label to display for this step. For example: "Mapping"
The describe_source section defines how to populate available data fields of the source.
The describe_target section defines how to populate available data fields of the target.
Both sections require these two attributes:
User friendly label to display for target or source. ActiveCampaign should always be stylized as "ActiveCampaign".
List of available fields to map.
For ActiveCampaign fields, use the !resource command, for example, "ActiveCampaignContact.fields".
For external fields, you can either provide a static list or pull from an API using a !pipe command.
The output should be a list of objects with "title", "id" and "required" attributes.
| Key | Purpose | JSON Type | Required |
|---|---|---|---|
| title | Display value for the option | string | yes |
| id | Unique ID and value for the option. Will be the value written to the target field if selected. | string or integer | yes |
| required | to indicate if an option must be mapped | boolean | no default value is false |
| group | define multiple distinct sources or targets | string | no |
| schemaId | for custom object fields | string | only for custom object groups |
| source_fields | For describe_target options only. List of user selectable values that does come from source. | array<source_field> | no |
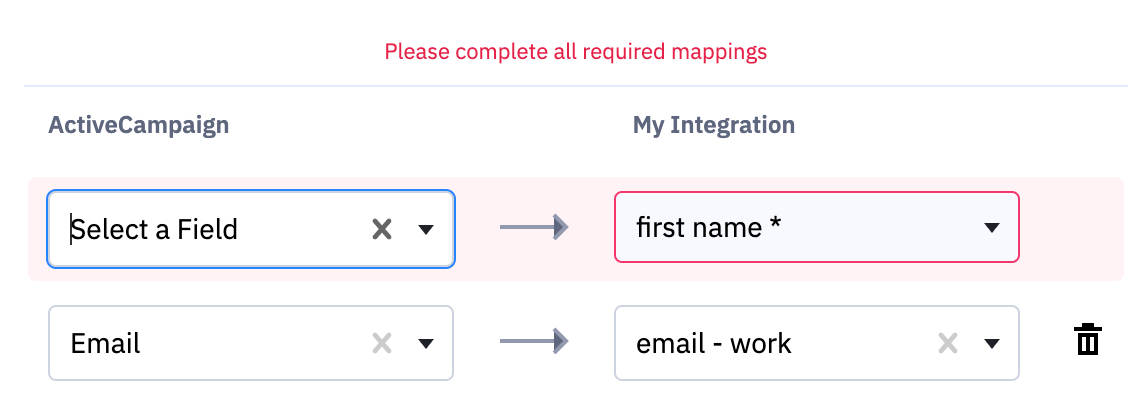
Required fields in mappingsThe "required" attribute only takes effect within "describe_target". This is to help make sure data can be processed after arriving at the destination:
- Inbound Apps: ActiveCampaign is the target, and the Email field is always required.
- Outbound Apps: developers are free to declare any field(s) as required, but at least one field mapping must be completed in the "mapping" step.
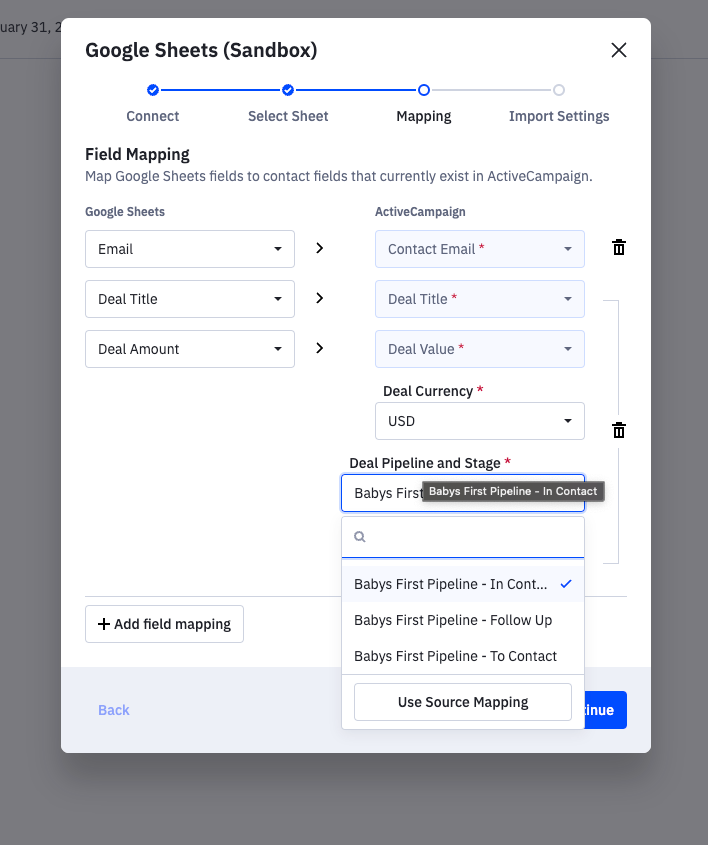
Our system will indicate this requirement in the UI with an asterisk (*) as shown below. Users must map all required fields before completing the integration setup. Please see the screenshot below.
Dynamic Source SelectionUsing
source_fieldsin adescribe_target.optionsallows you to define a user-selectable list ofoptionswhose values are fixed. When mapped, these fields will not be populated from the source data but will be set to the selected value instead.This is especially useful when required fields in the target are not present in the expected source data; for example, in ActiveCampaign, deal records need a Stage ID, a number unique to each user that won’t be present in the source. To allow Deals as targets, in our config, we would fetch the users deal stages and organize the result into an array of source_fields under the deal Stage Field
option.
| Attribute | Purpose | JSON Type | Required |
|---|---|---|---|
| title | Display value for the option | string | yes |
| id | Unique ID and value for the source_field. Will be the value written to the target field if selected. | string or integer | yes |
View a detailed example here to see how mapping options are rendered.
Migrating from flat mapping to grouped mapping
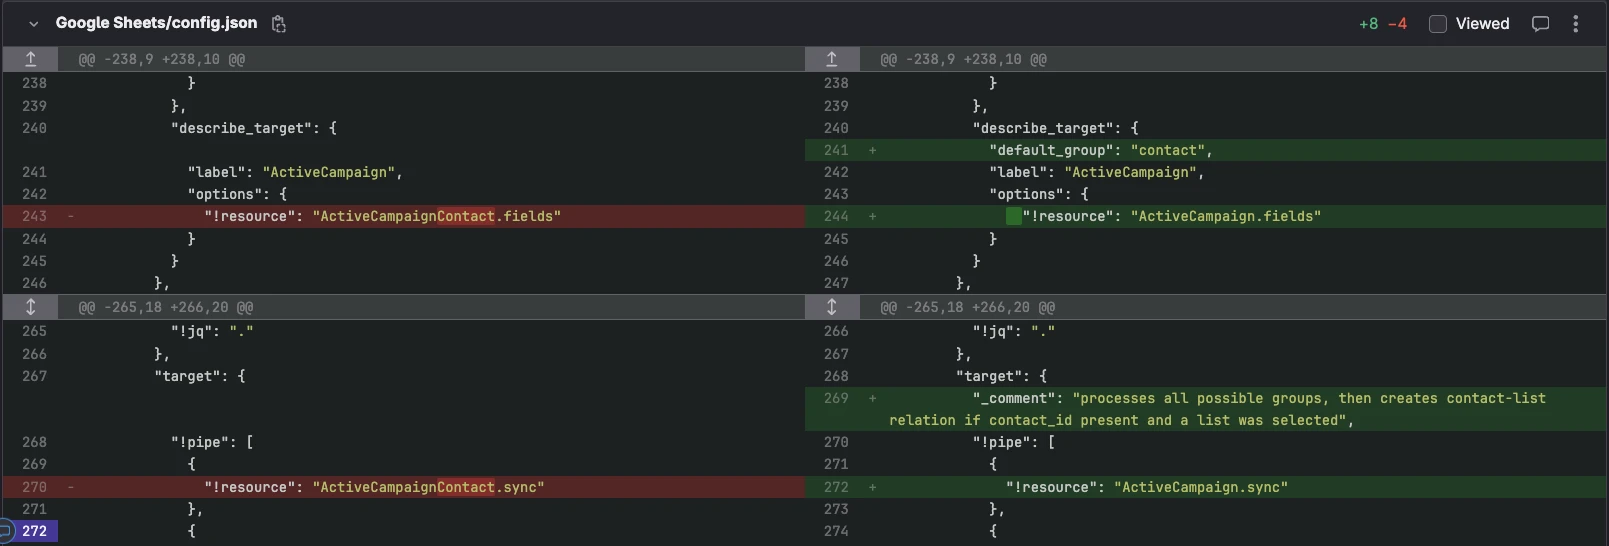
A new key default_group was introduced to facilitate updating an existing map from flat to grouped mappings. This is only intended for updating an existing app from flat to grouped mappings. Users with existing mappings saved flat will see them grouped under the default_group key when navigating to the edit mappings page when the new grouped version is published. During processing, given a flat mapping and a default_group value, the data_pipeline processes the transform as if the mappings are grouped under the default_group value. default_group is ignored if a user has saved grouped mappings.
| Key | JSON Type | Required |
|---|---|---|
| label | string | yes |
| options | object | yes |
| default_group | string | no |
Shown here is how we migrated our Google Sheets Inbound Workflow from flat to grouped:
Here is an example of the subsequent data_pipeline states when using the default_group for this integration:
Mappings are flat
default_group="contact"

data_pipeline.source output
{
    "A": "valueA",
    "B": "valueB",
    "C": "valueC",
    "D": "valueD"
}

===> Transform ===>

data_pipeline.target input

{
"contact":{
  "target_fieldA": "valueA",
  "target_fieldB": "valueB",
  "target_field1": "valueC",
  "target_field2": "valueD"
}This section defines how data is processed. All payloads go through 3 steps in the data pipeline, source, transform, and target. See diagram below:
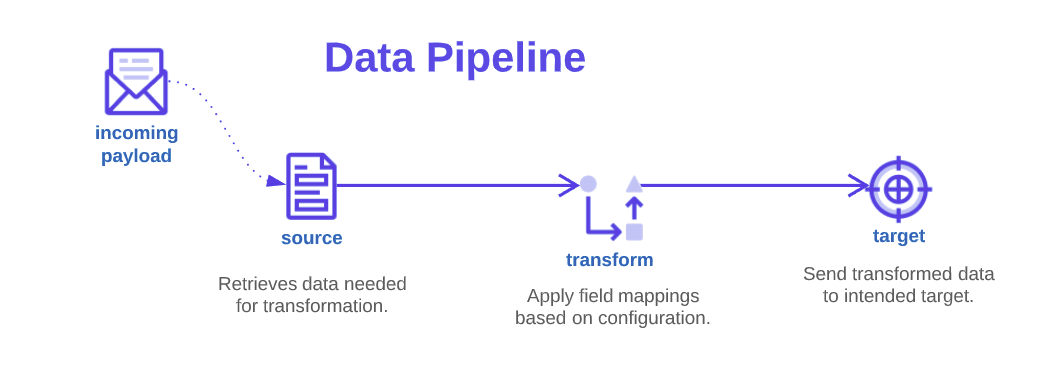
The "transform" step happens automatically (see details below), but you still need to define source and target.
When data is received by the integration, it's picked up by the source directly. The source section transforms data received by the integration to the correct format for the next step (transform).
InfoIf the incoming payload is an ID, this section should contain a command that defines how to retrieve data needed for transformation. It's often a pipe command that consists of an HTTP request which fetches data based on ID, and a JQ transformation that converts data to a flat object if needed.
To transform data using existing field mappings, the integration backend expects data payloads to be valid JSON objects with fields at the root level.
The responsibility of the source section is to make sure data is in the correct format.
For example, if the incoming payload is:
{
  "timestamp": "2020-02-02T00:00:00",
  "data": {
    "Name": "Campy",
    "Age": 18
  }
}
It should be converted to:
{
  "Name": "Campy",
  "Age": 18
}
To create contacts with custom tags, the output of this step should also include _tags, which is an array of strings.
{
  "Name": "Campy",
  "Age": 18,
  "_tags": ["variant-a"]
}
transform (automatic)
NoteThe integration automatically applies field mappings, so the output of this section is still a JSON object, whose keys are all mapped to external keys, and values are extracted from the incoming payload. See example below.
Given the output of source is:
{
  "Name": "Campy",
  "Age": 18
}
and the field mappings configured by the user are:
{
  "Name": "name_for_account",
  "Age": "age_for_account"
}
The expected output from transform is:
{
  "name_for_account": "Campy",
  "age_for_account": 18
}The target section should be a command that's responsible for sending the formatted payload to its destination. It's a possibility that you need to further transform the data for the target.
For example, you might want to transform the output from the previous step to the following before sending:
{
  "data": {
    "name_for_account": "Campy",
    "age_for_account": 18
  },
  "action": "update"
}
All transformations should be included in this section before sending the payload.
See this example for details.
Grouped mapping example
Using groups in the describe_target section of the map step will result in storing mappings in a new format. When passed from the data_pipeline.source to the transform, data must be grouped into nested dictionaries under each intended group to see them have grouped mappings applied in the transform step.
The table below outlines the possible combinations for the map step. Depending on the combination, there are different formats the transform expects to receive from the output of the data_pipeline.source and, similarly, the formatting of the output of the transform changes too.
| Combination | Grouped Target | Flat Target |
|---|---|---|
| Grouped Source | All data from each source group should be an object of key-value pairs accessible under keys that match the group name. | Same as grouped source, grouped target, except the output of the transform will be flat. |
| Flat Source | Input should be an object of key-value pairs with no nested values. Transform output will group data under each field's group. | This is the standard flat mapping whose rules are unchanged. |
Updated about 1 year ago